1974 Honda CT70/Dax Custom Build begins

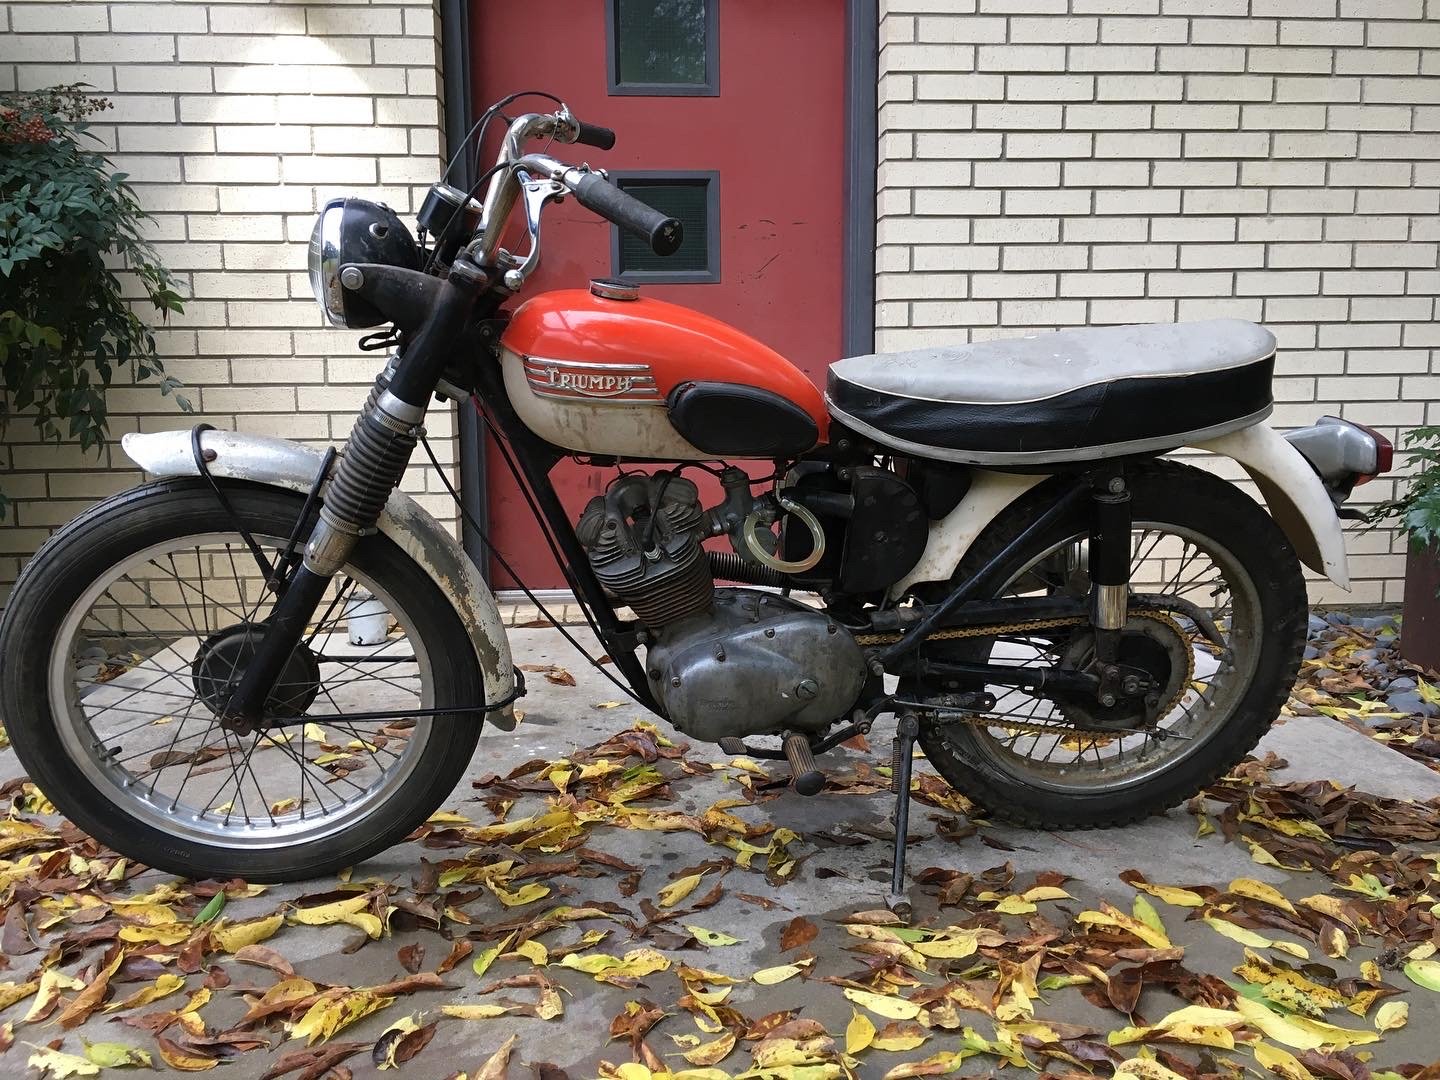
Time to begin another custom small Honda build. Based somewhat on the CT117, built in 2010, there will be similarities, such as the long, low stance, the rear-hinged seat with the gas cap poking through, and low handle bars. With a good bit of the fabrication already done, the plan is to add a few more things like footpegs, engine cradle, exhaust, and possibly a front fairing, before moving on to finishes.

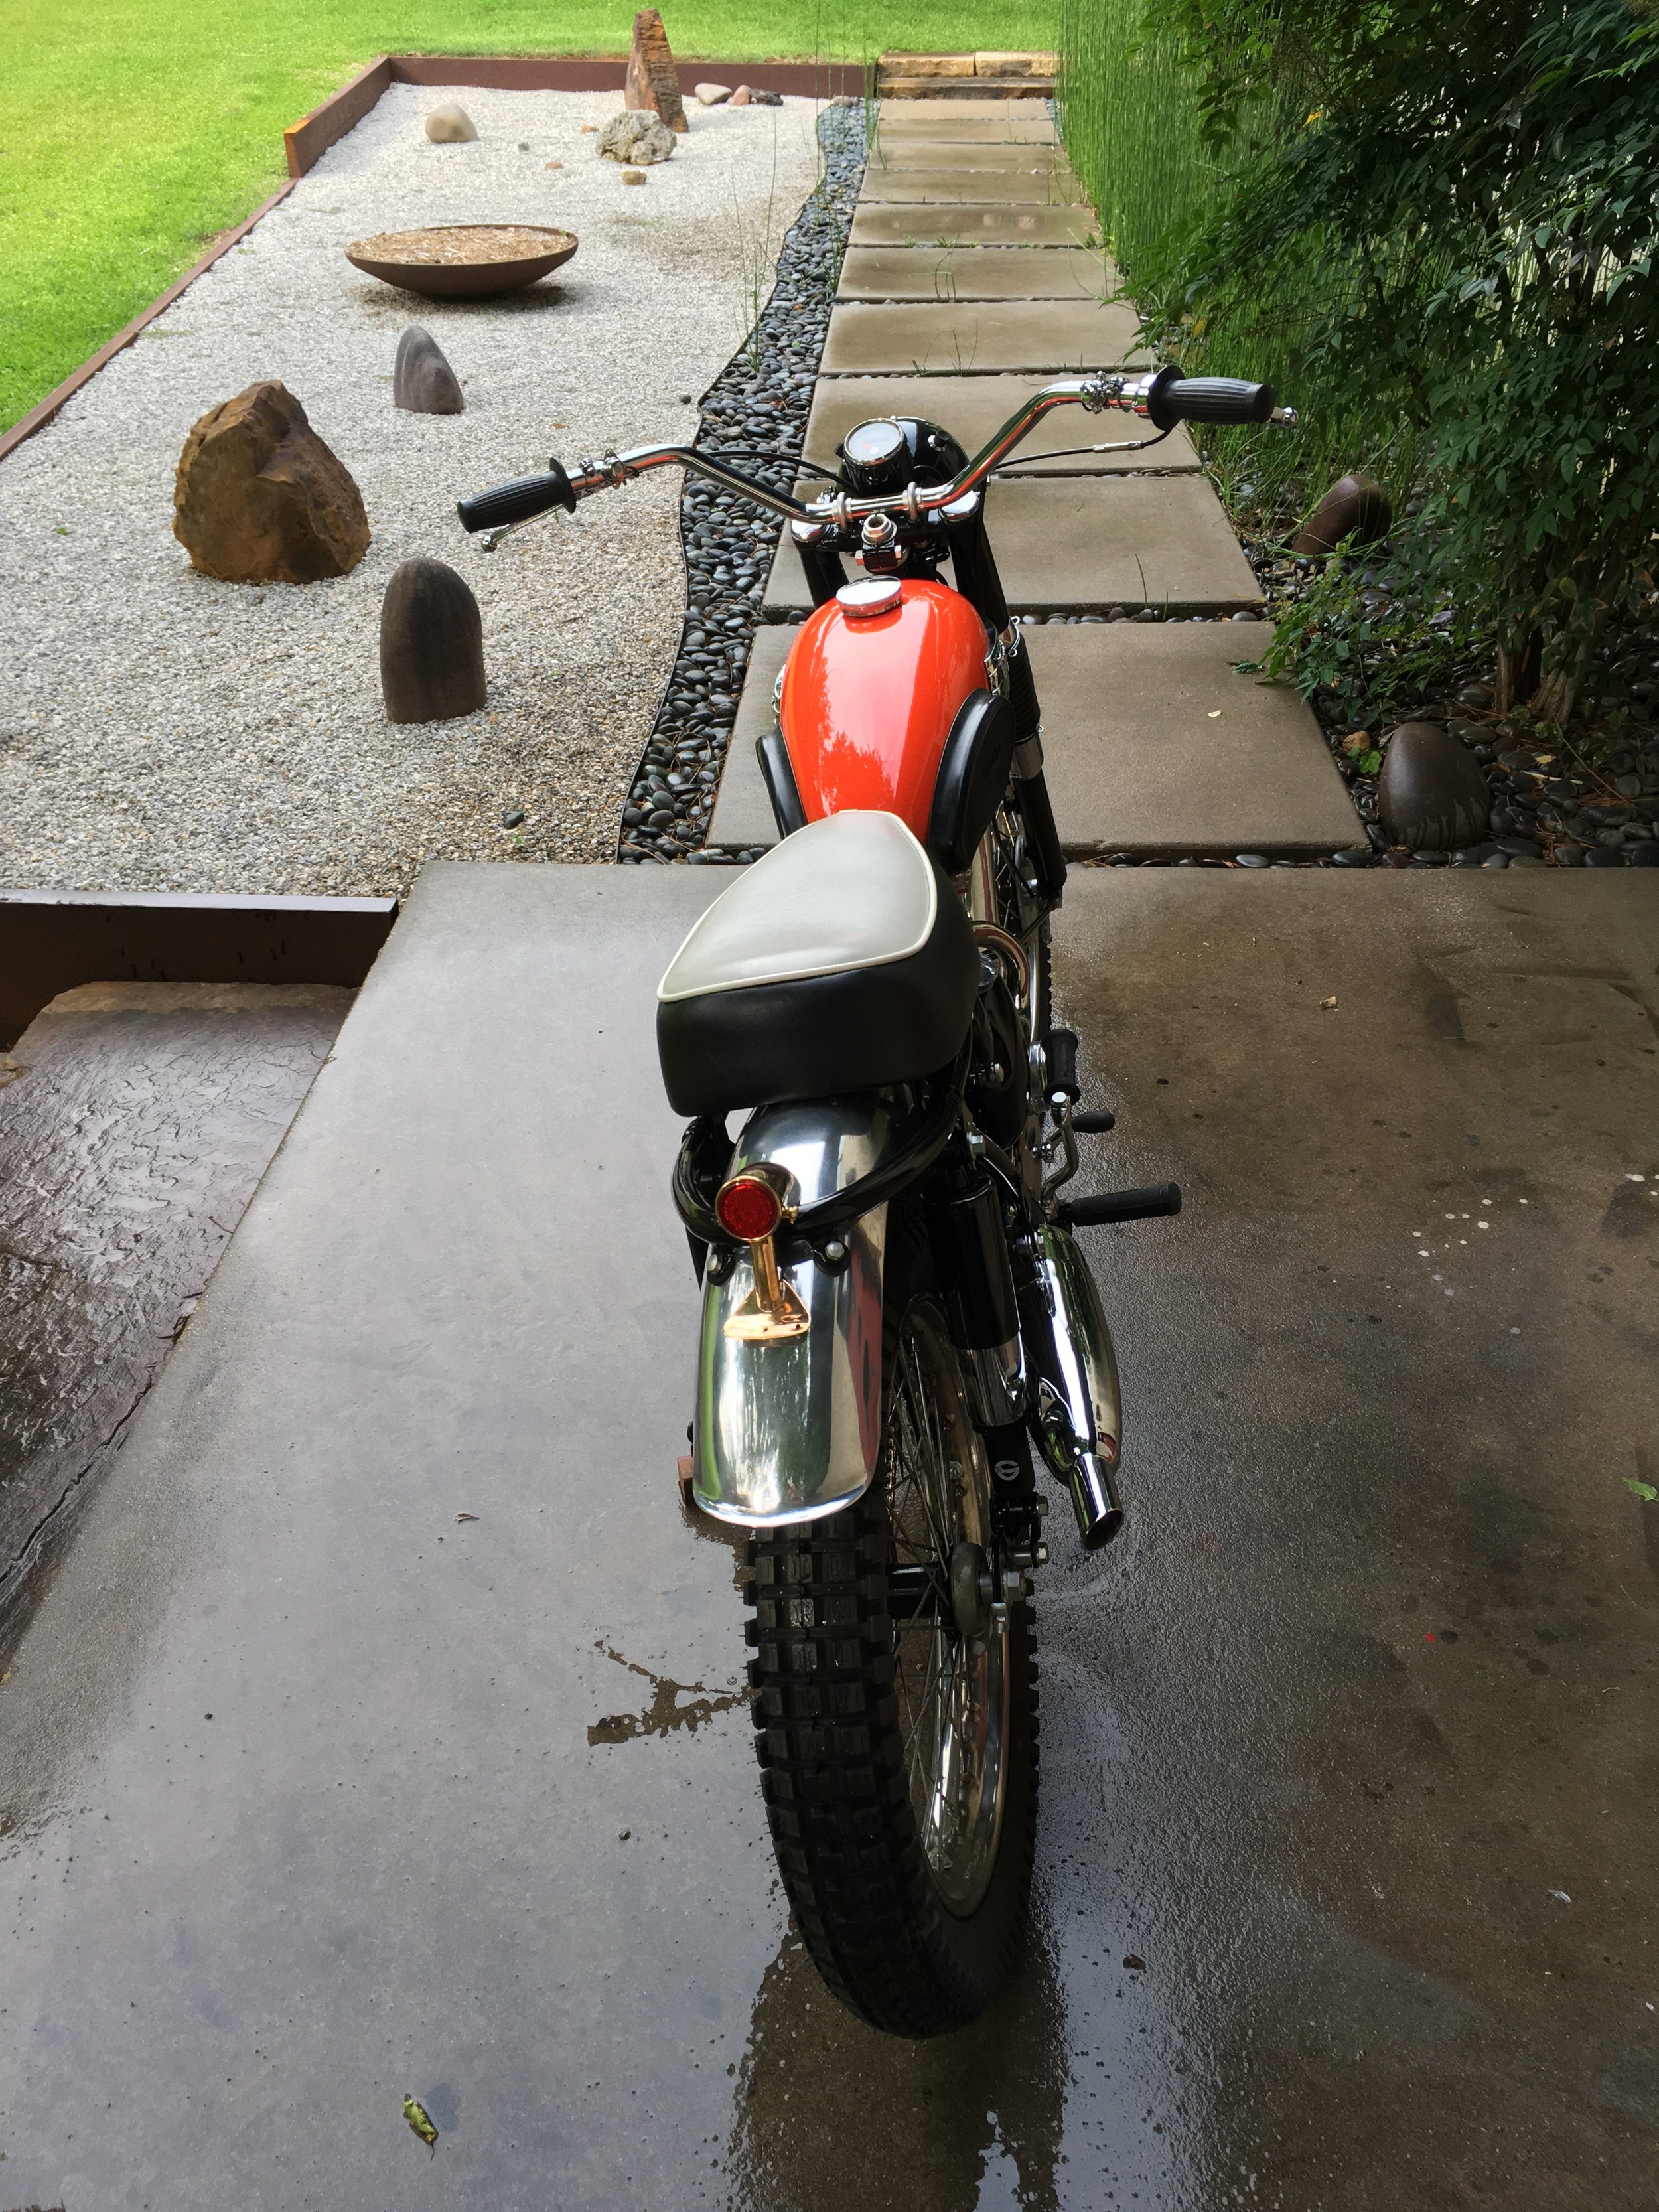
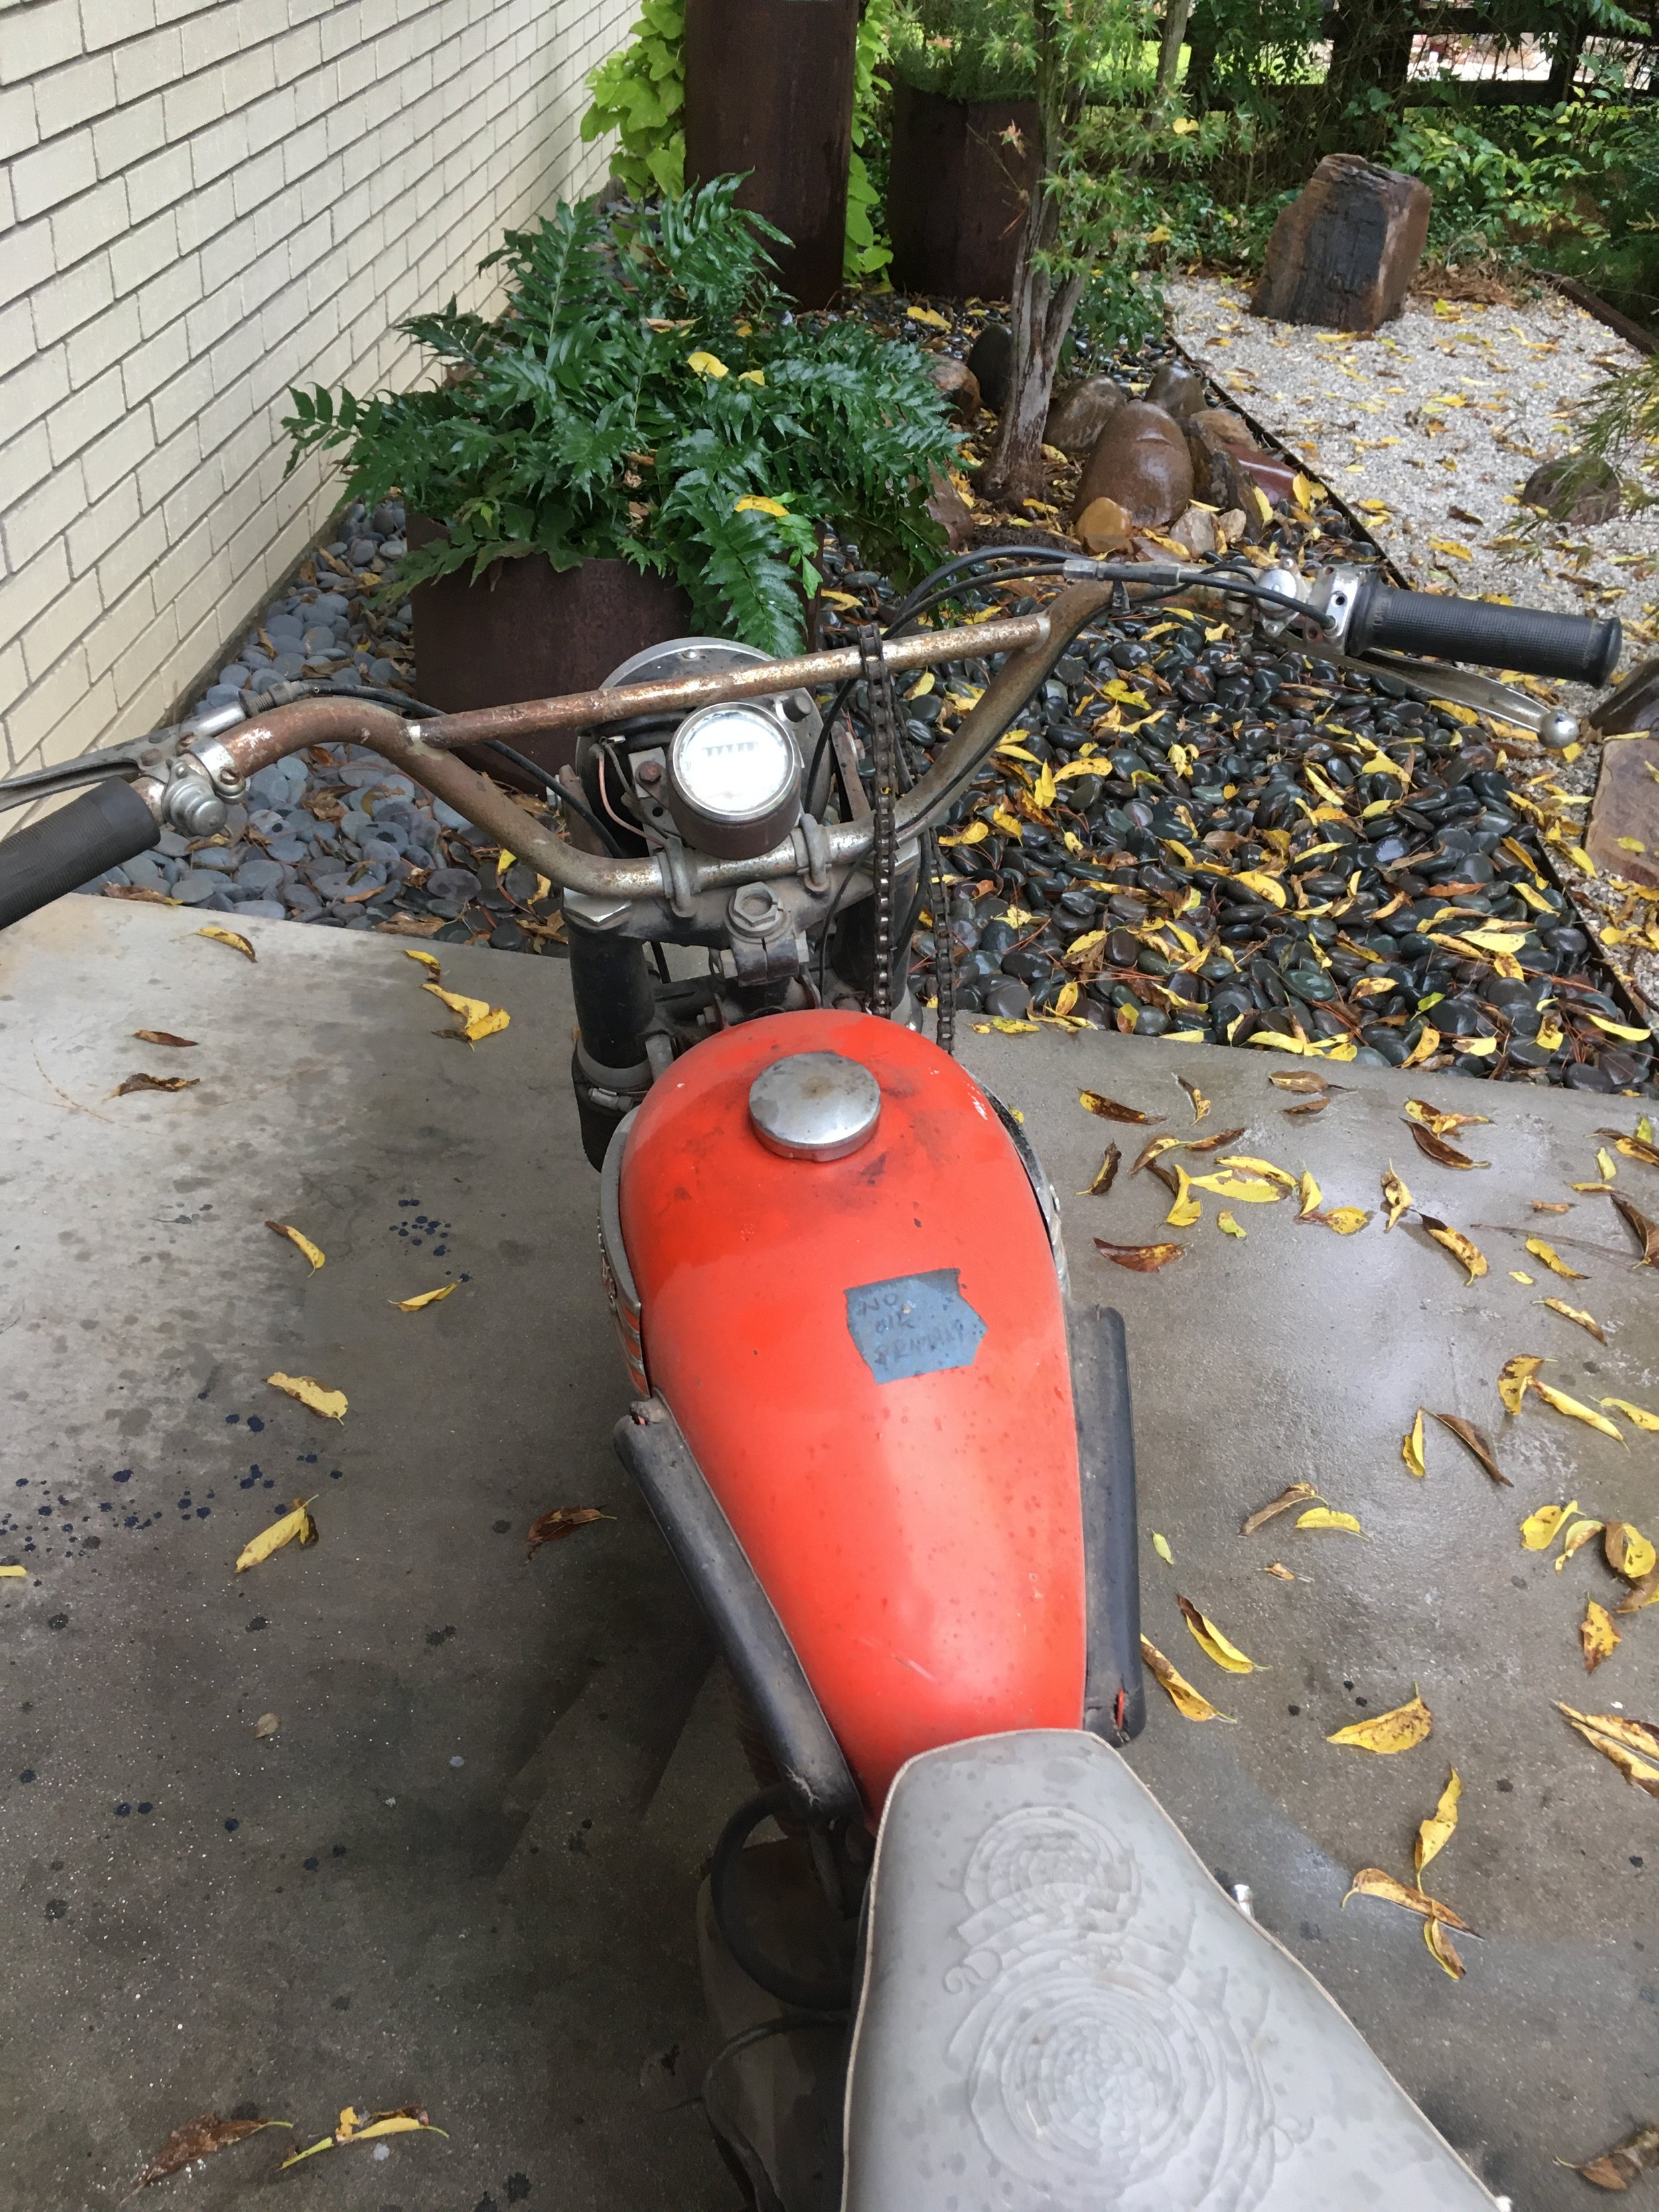
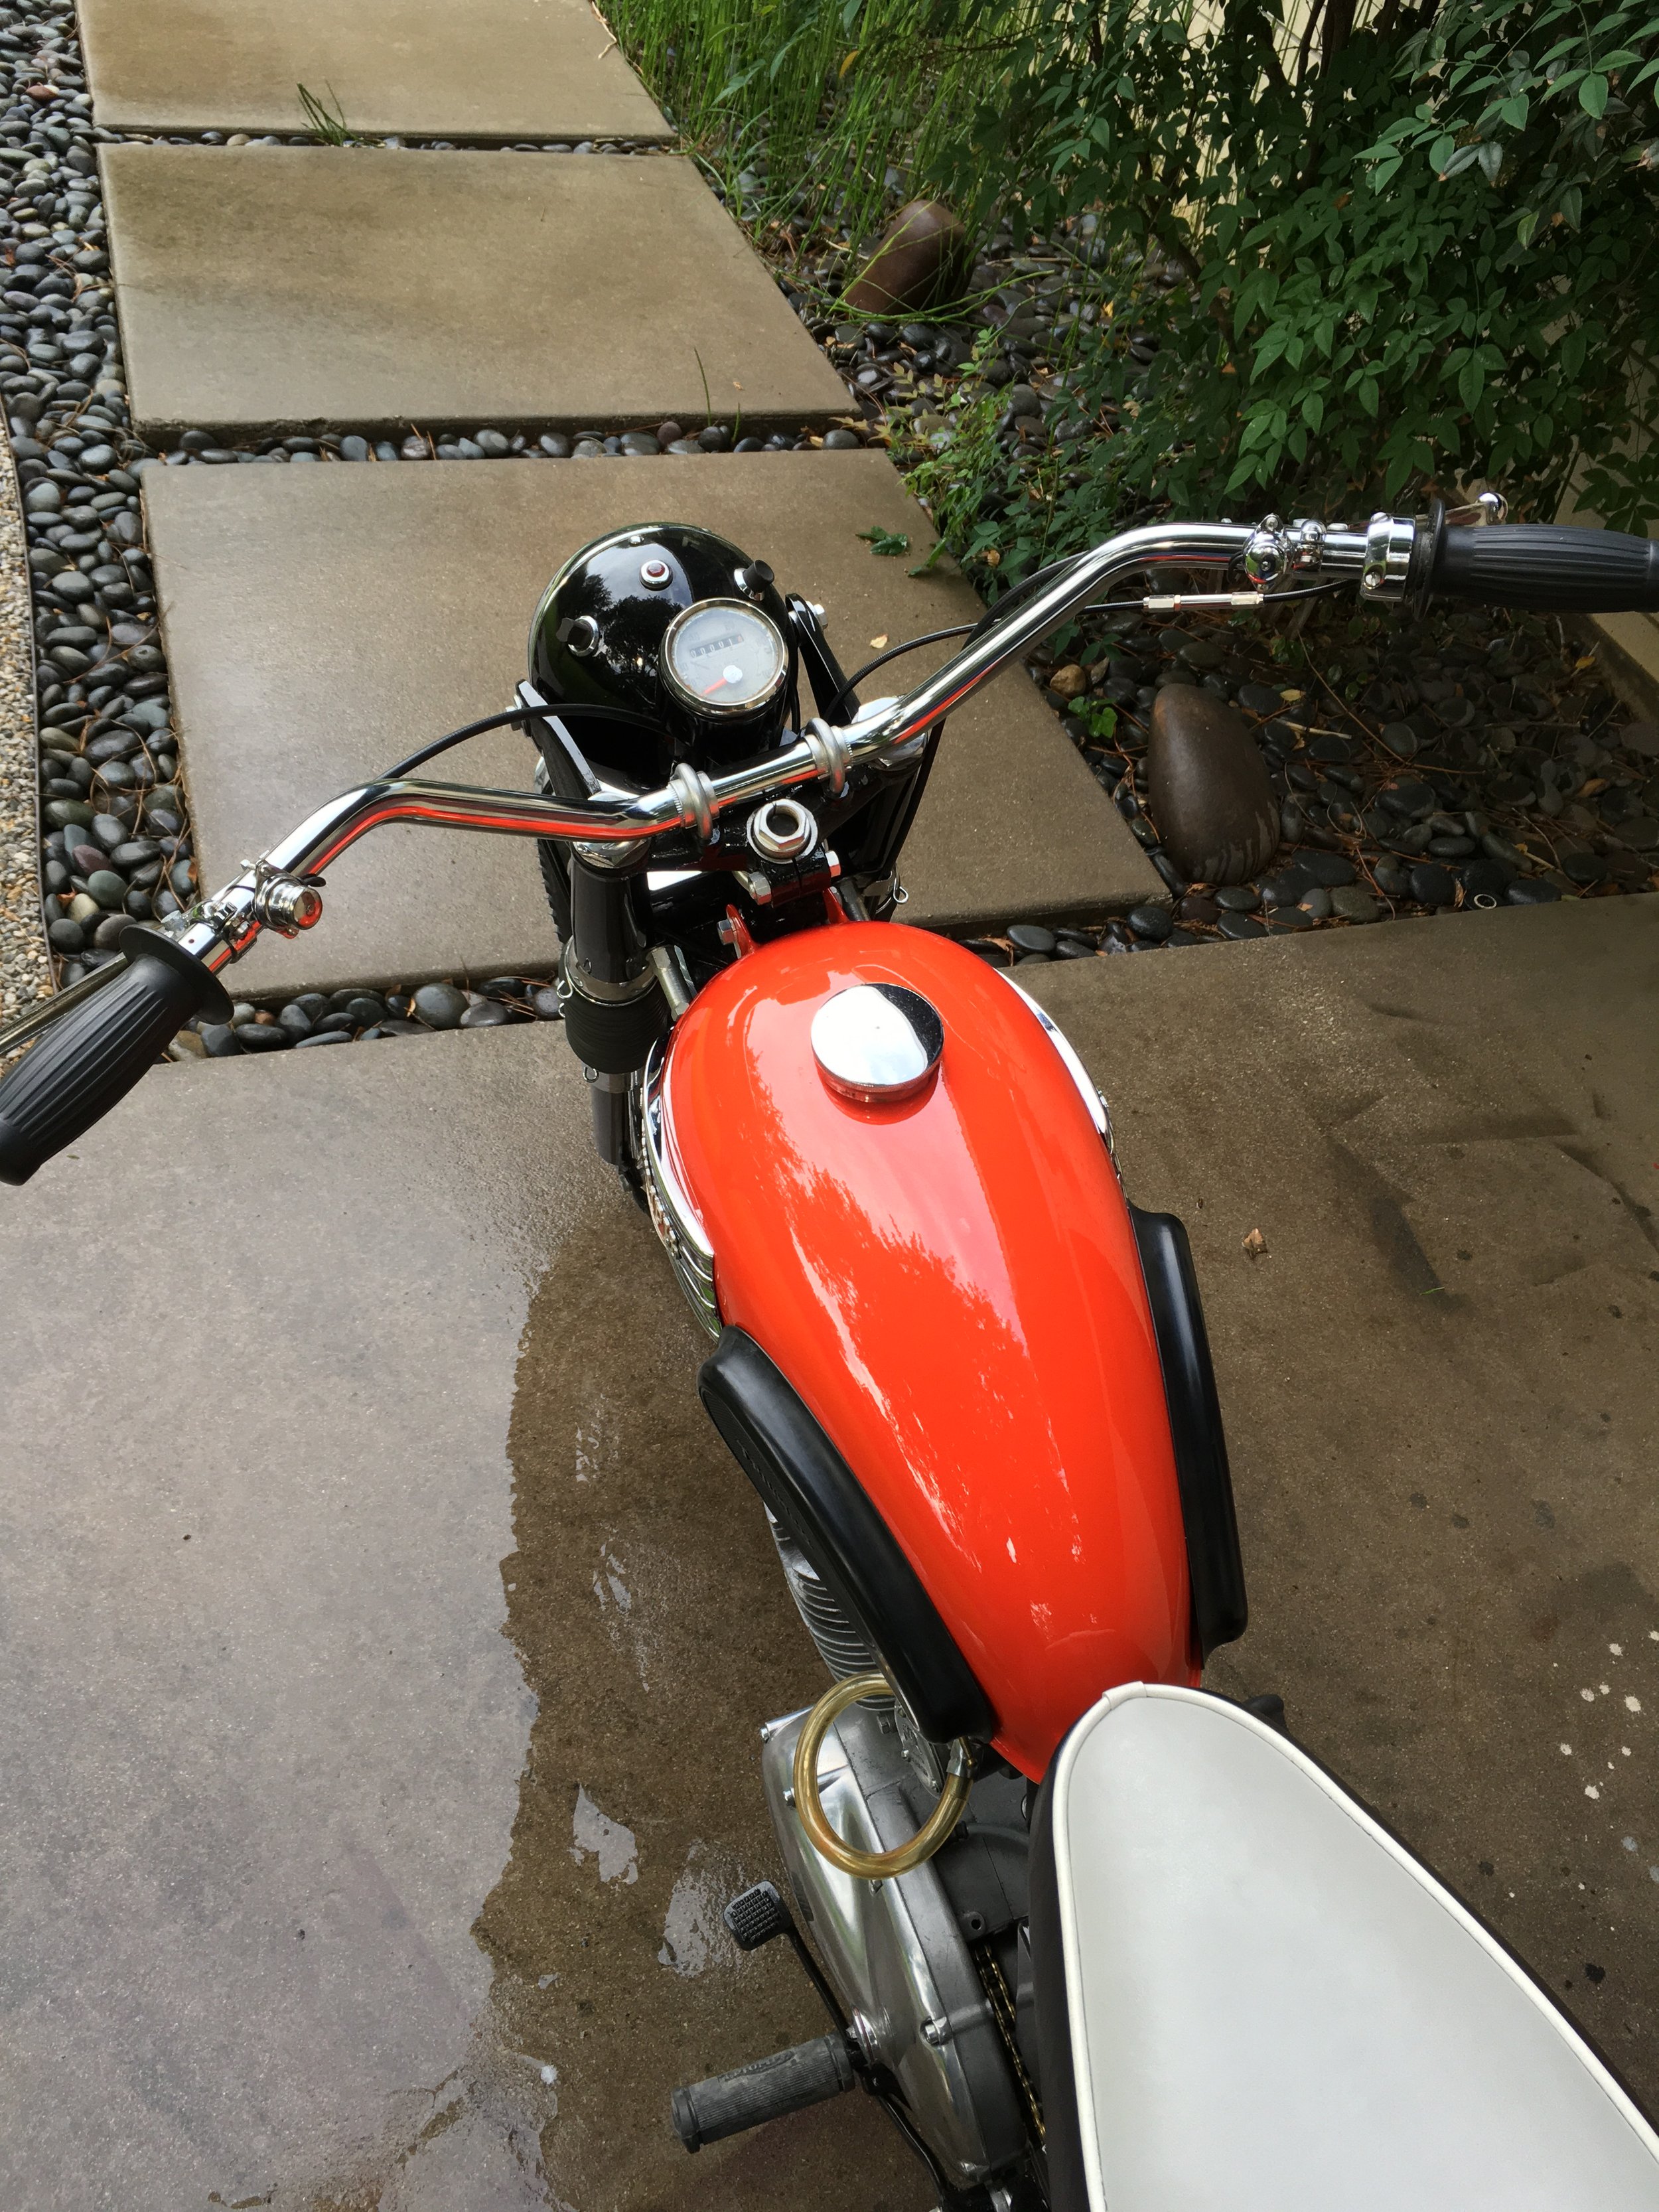
One of the first jobs was getting the stance right. The front fork tubes and springs were shortened about 45mm to get a similar height to the CT117. The handlebars were made from the stock bars. With the bars in place, a round headlight just looked wrong. It was either too high or too far forward to fit in. I had a rectangular signal light from a big rig, and it made the front come together. Don’t know if the amber lens is going to stay, but it looks pretty cool. The headlight is mounted on a custom tubular steel bracket that utilizes existing mounting holes. Without headlight ears the fork tubes stay clean.

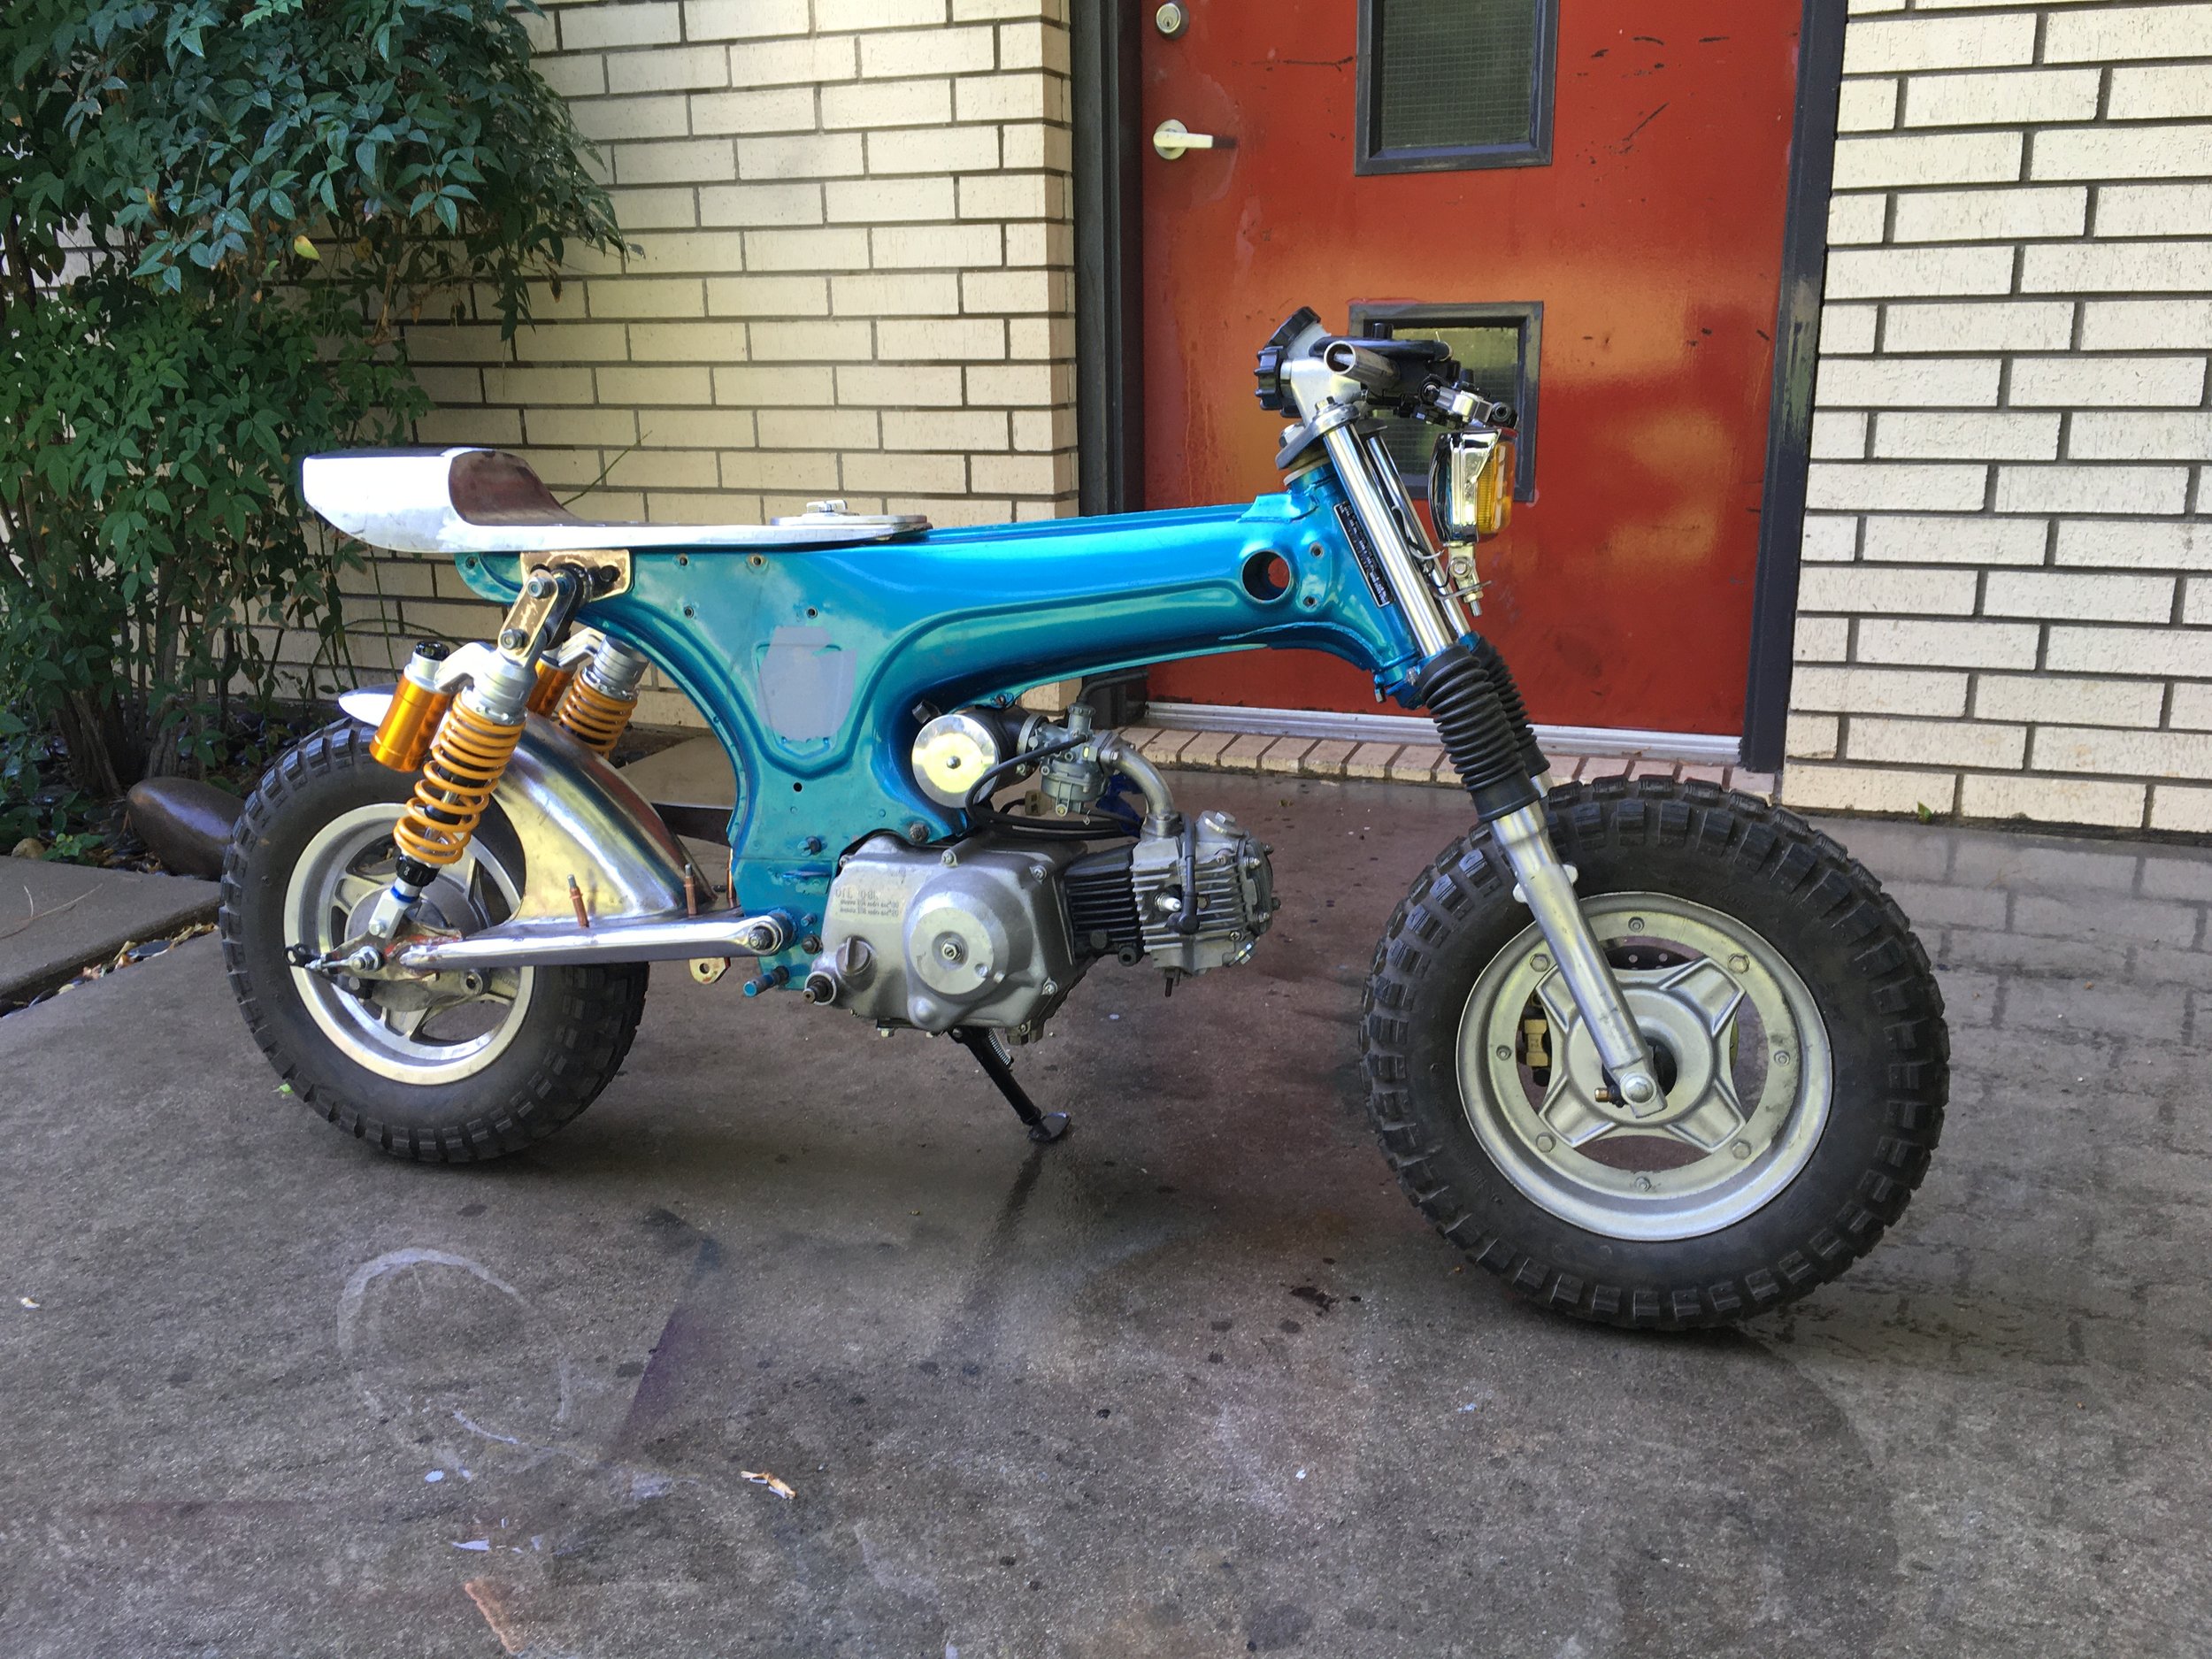
The swingarm is from a Honda XR80, and has been lengthened to 16” There are custom covers on the sides of the swingarm to echo the frame body lines.

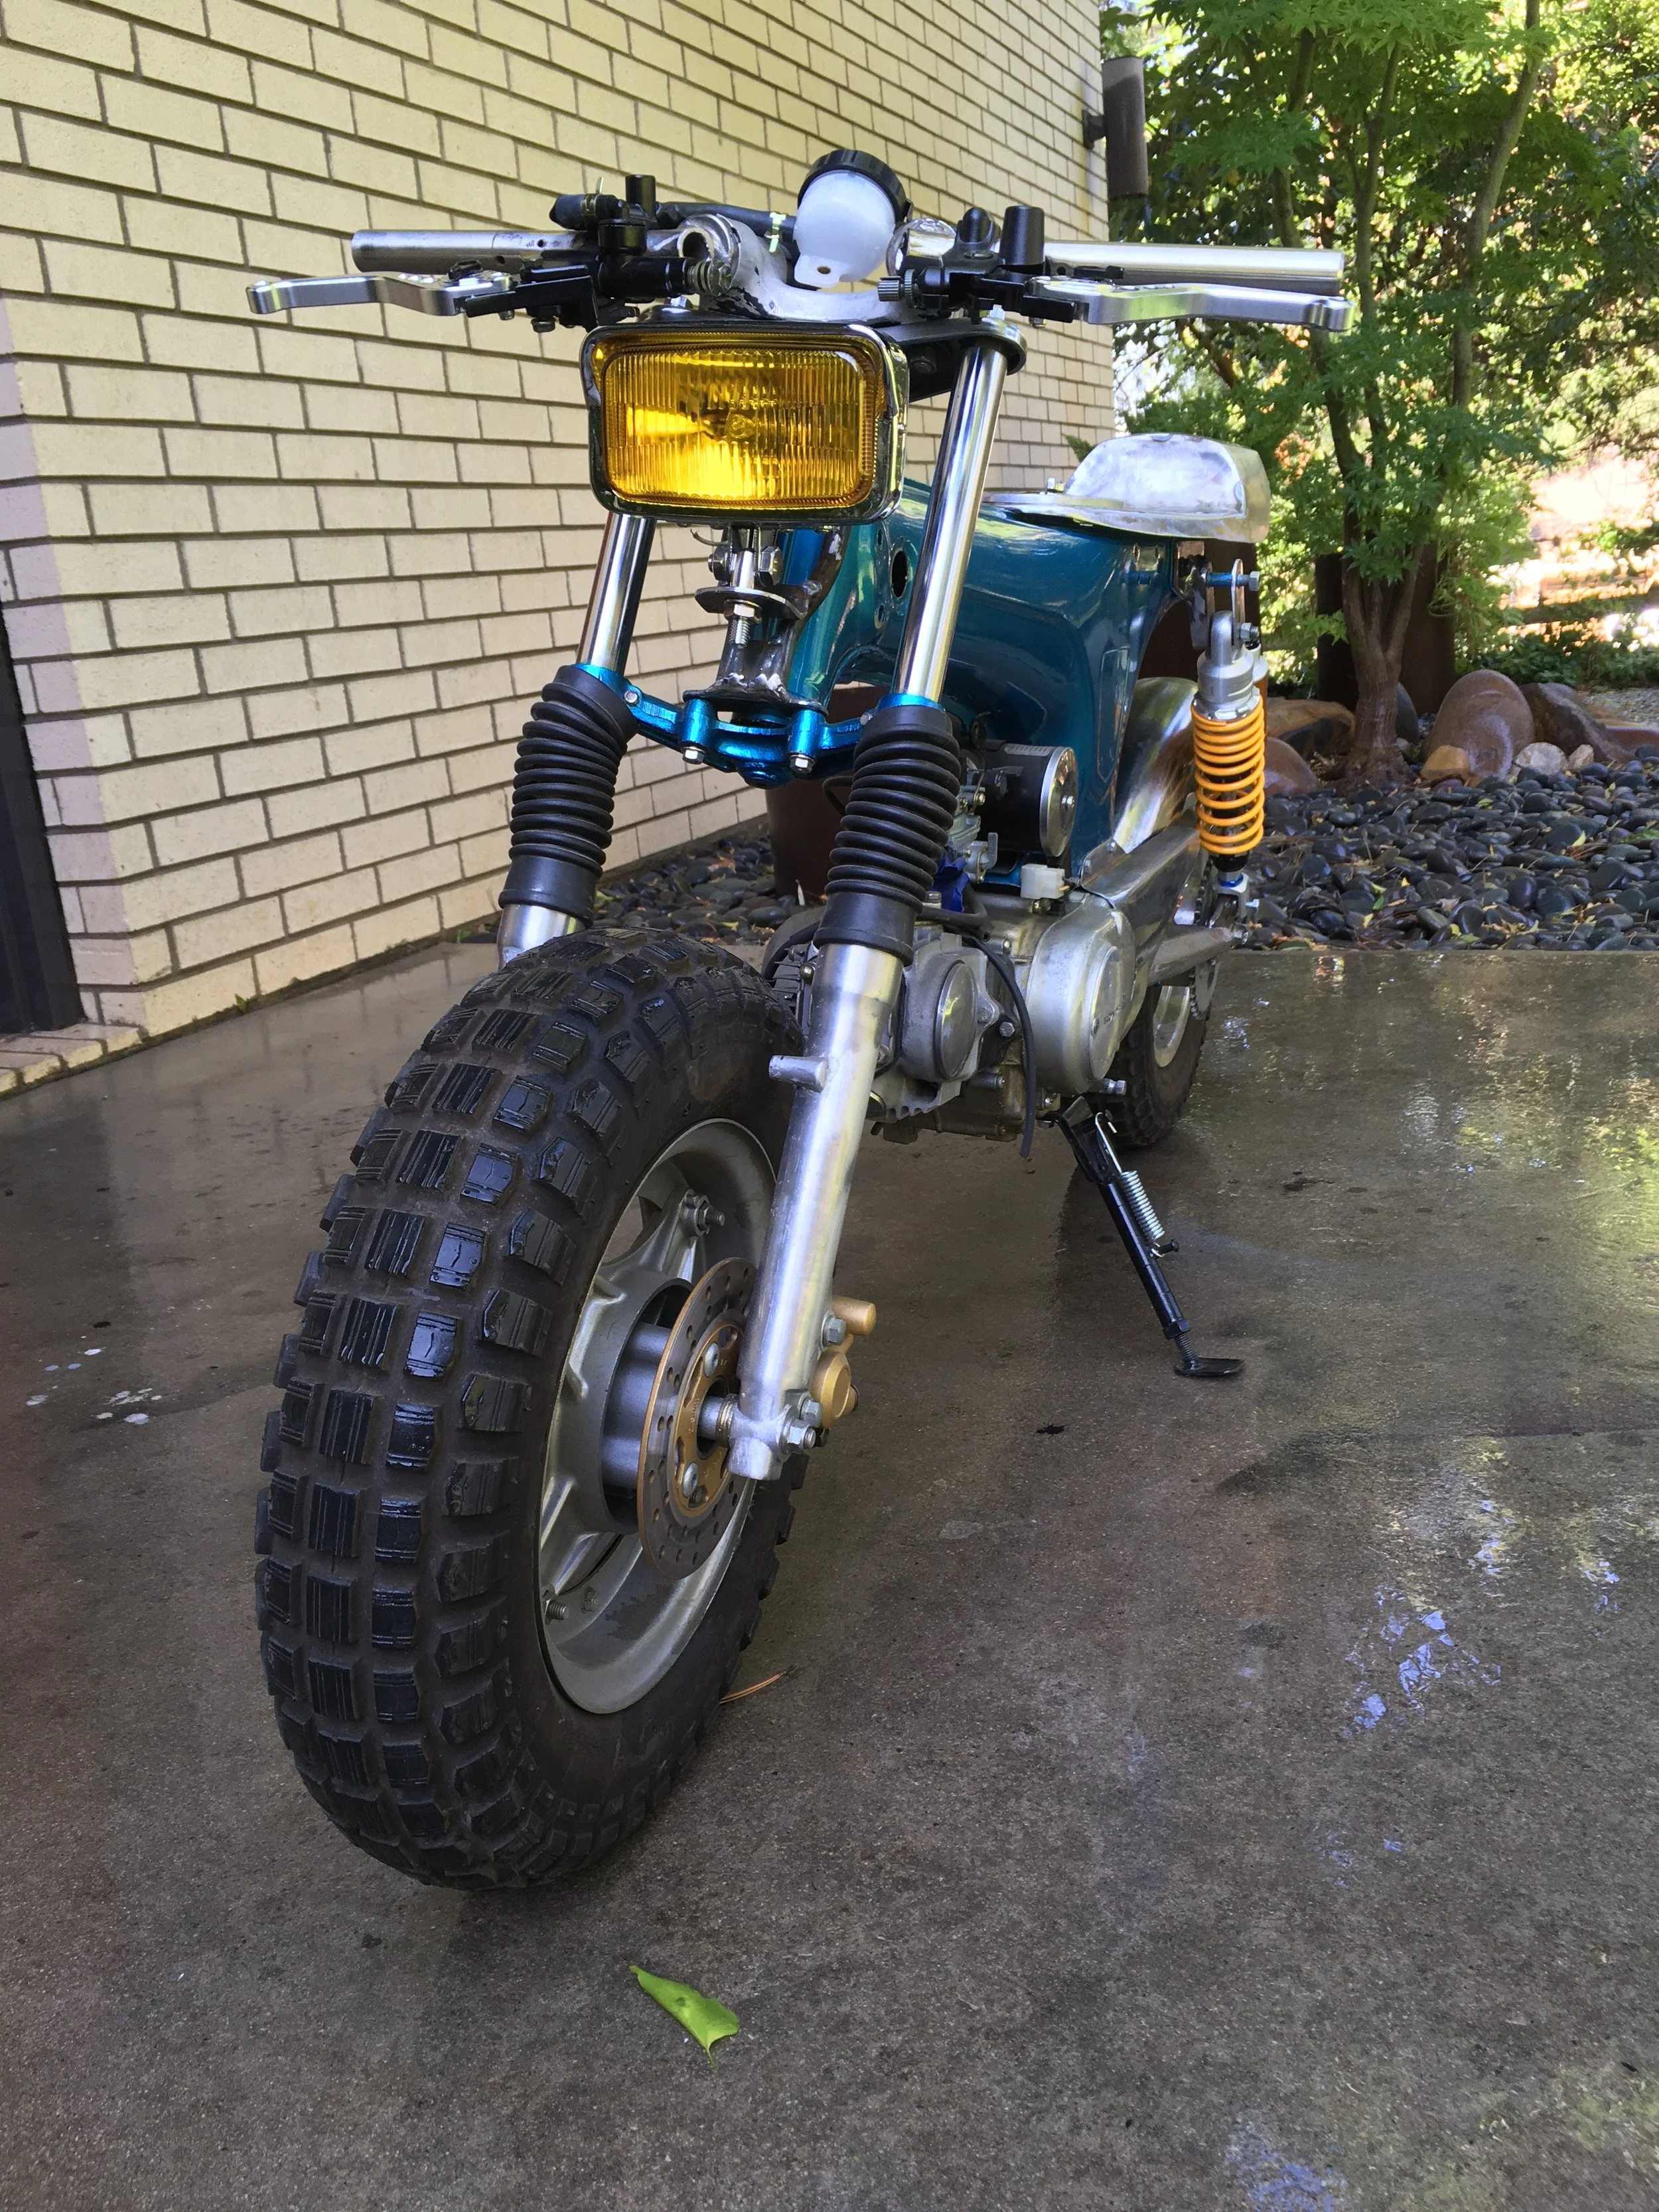
A hydraulic front disc brake came on the bike, but shorter, more compact levers and master cylinder were needed to fit the build. The master cylinder is just resting loosely until things like speedo placement and a fairing are figured out.

The rear fender base fits in the recess of the swingarm nicely. The swingarm used for this bike is significantly different from the stock one, in that it mounts to the outside of the frame, opposed to the inside recess, as the stock CT70 does. This is how the Honda ST90 is set up, basically. Some bracing and an inner spacer will need to be added once the bike is broken down.

The chain guard is a favorite of mine. The magneto cover will be opened up to reveal the counter sprocket. The original CT70/Dax frame is a beautiful piece of art. The design blends rounded organic curves with chiseled geometric lines, that I feel are often overlooked. When the original swingarm was replaced with the longer tubular one, the beauty of the original was apparent. This led to the side covers on the swingarm, that are meant to add some of that angular, curving lines back to the design. The chain guard and seat were designed with the same thought in mind. The lines of the rear fender echo the rear frame curves.

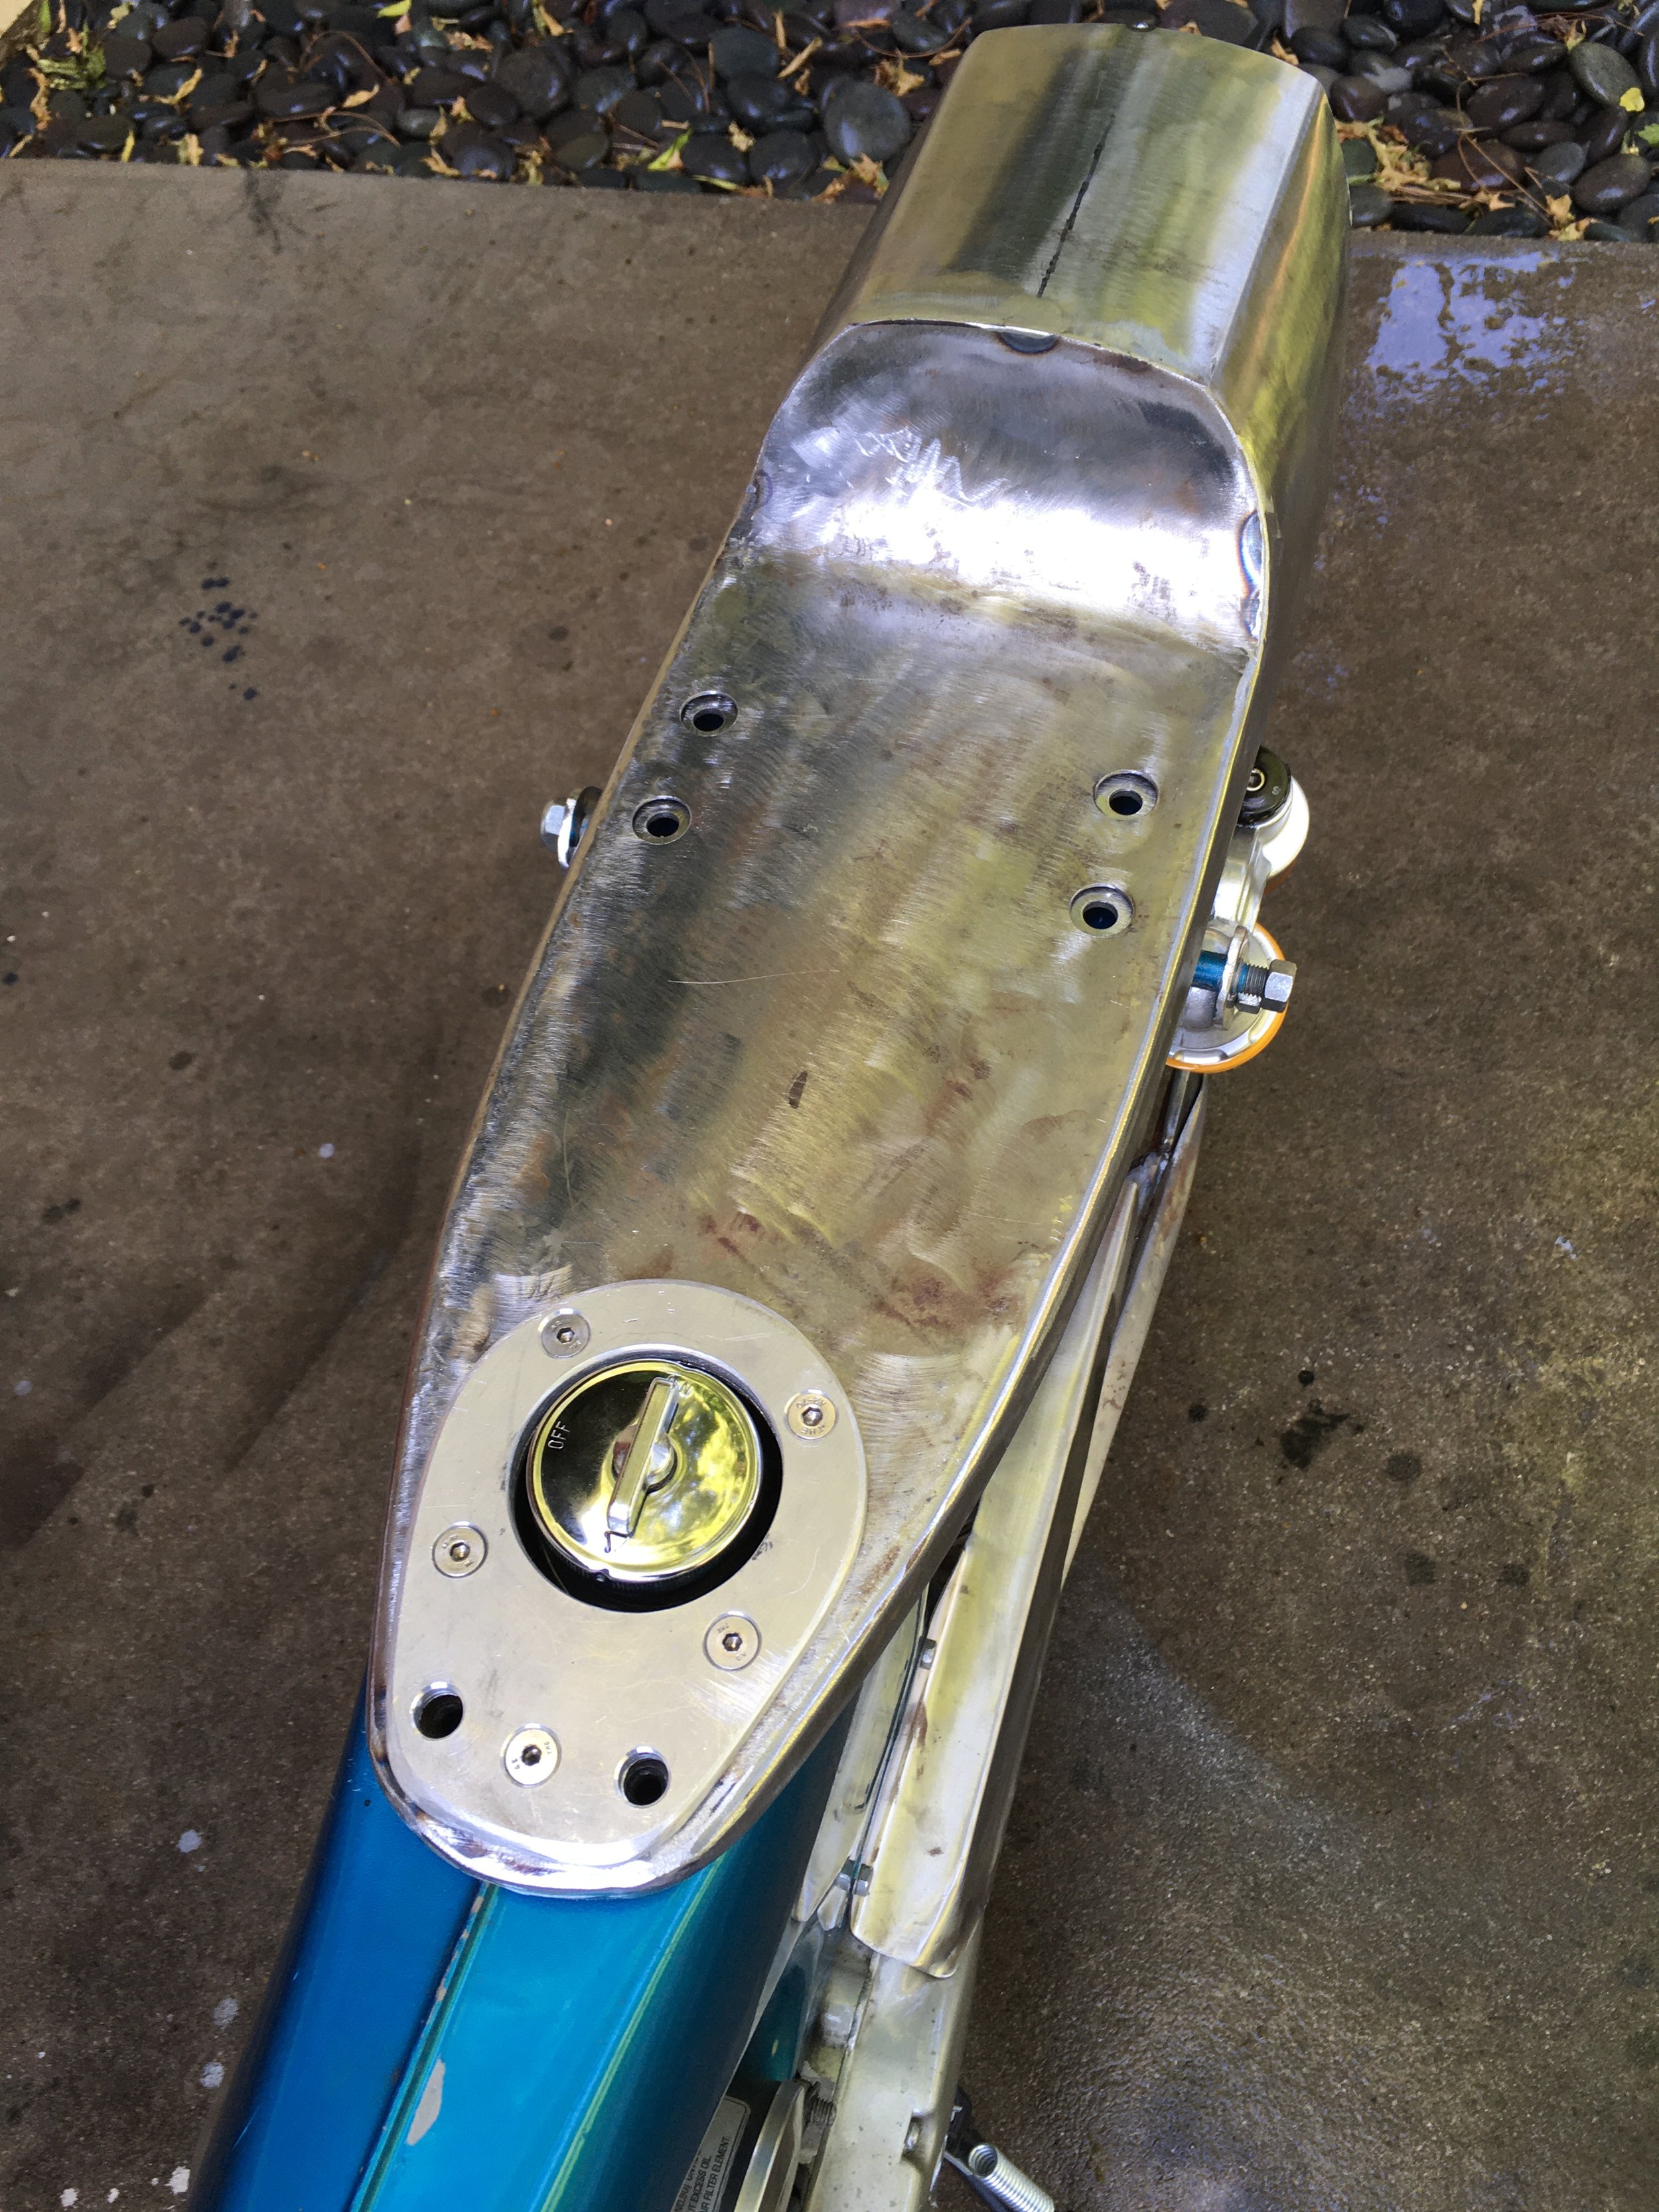
The seat assembly is a big part of the build, and has taken a good bit of time to get to this point. The design took a little time to form, but once decided, the seat pan was made first, with a seat frame and hinge then made to fit the pan, and finally the tail light assembly and aluminum sconce around the fuel tank cap.

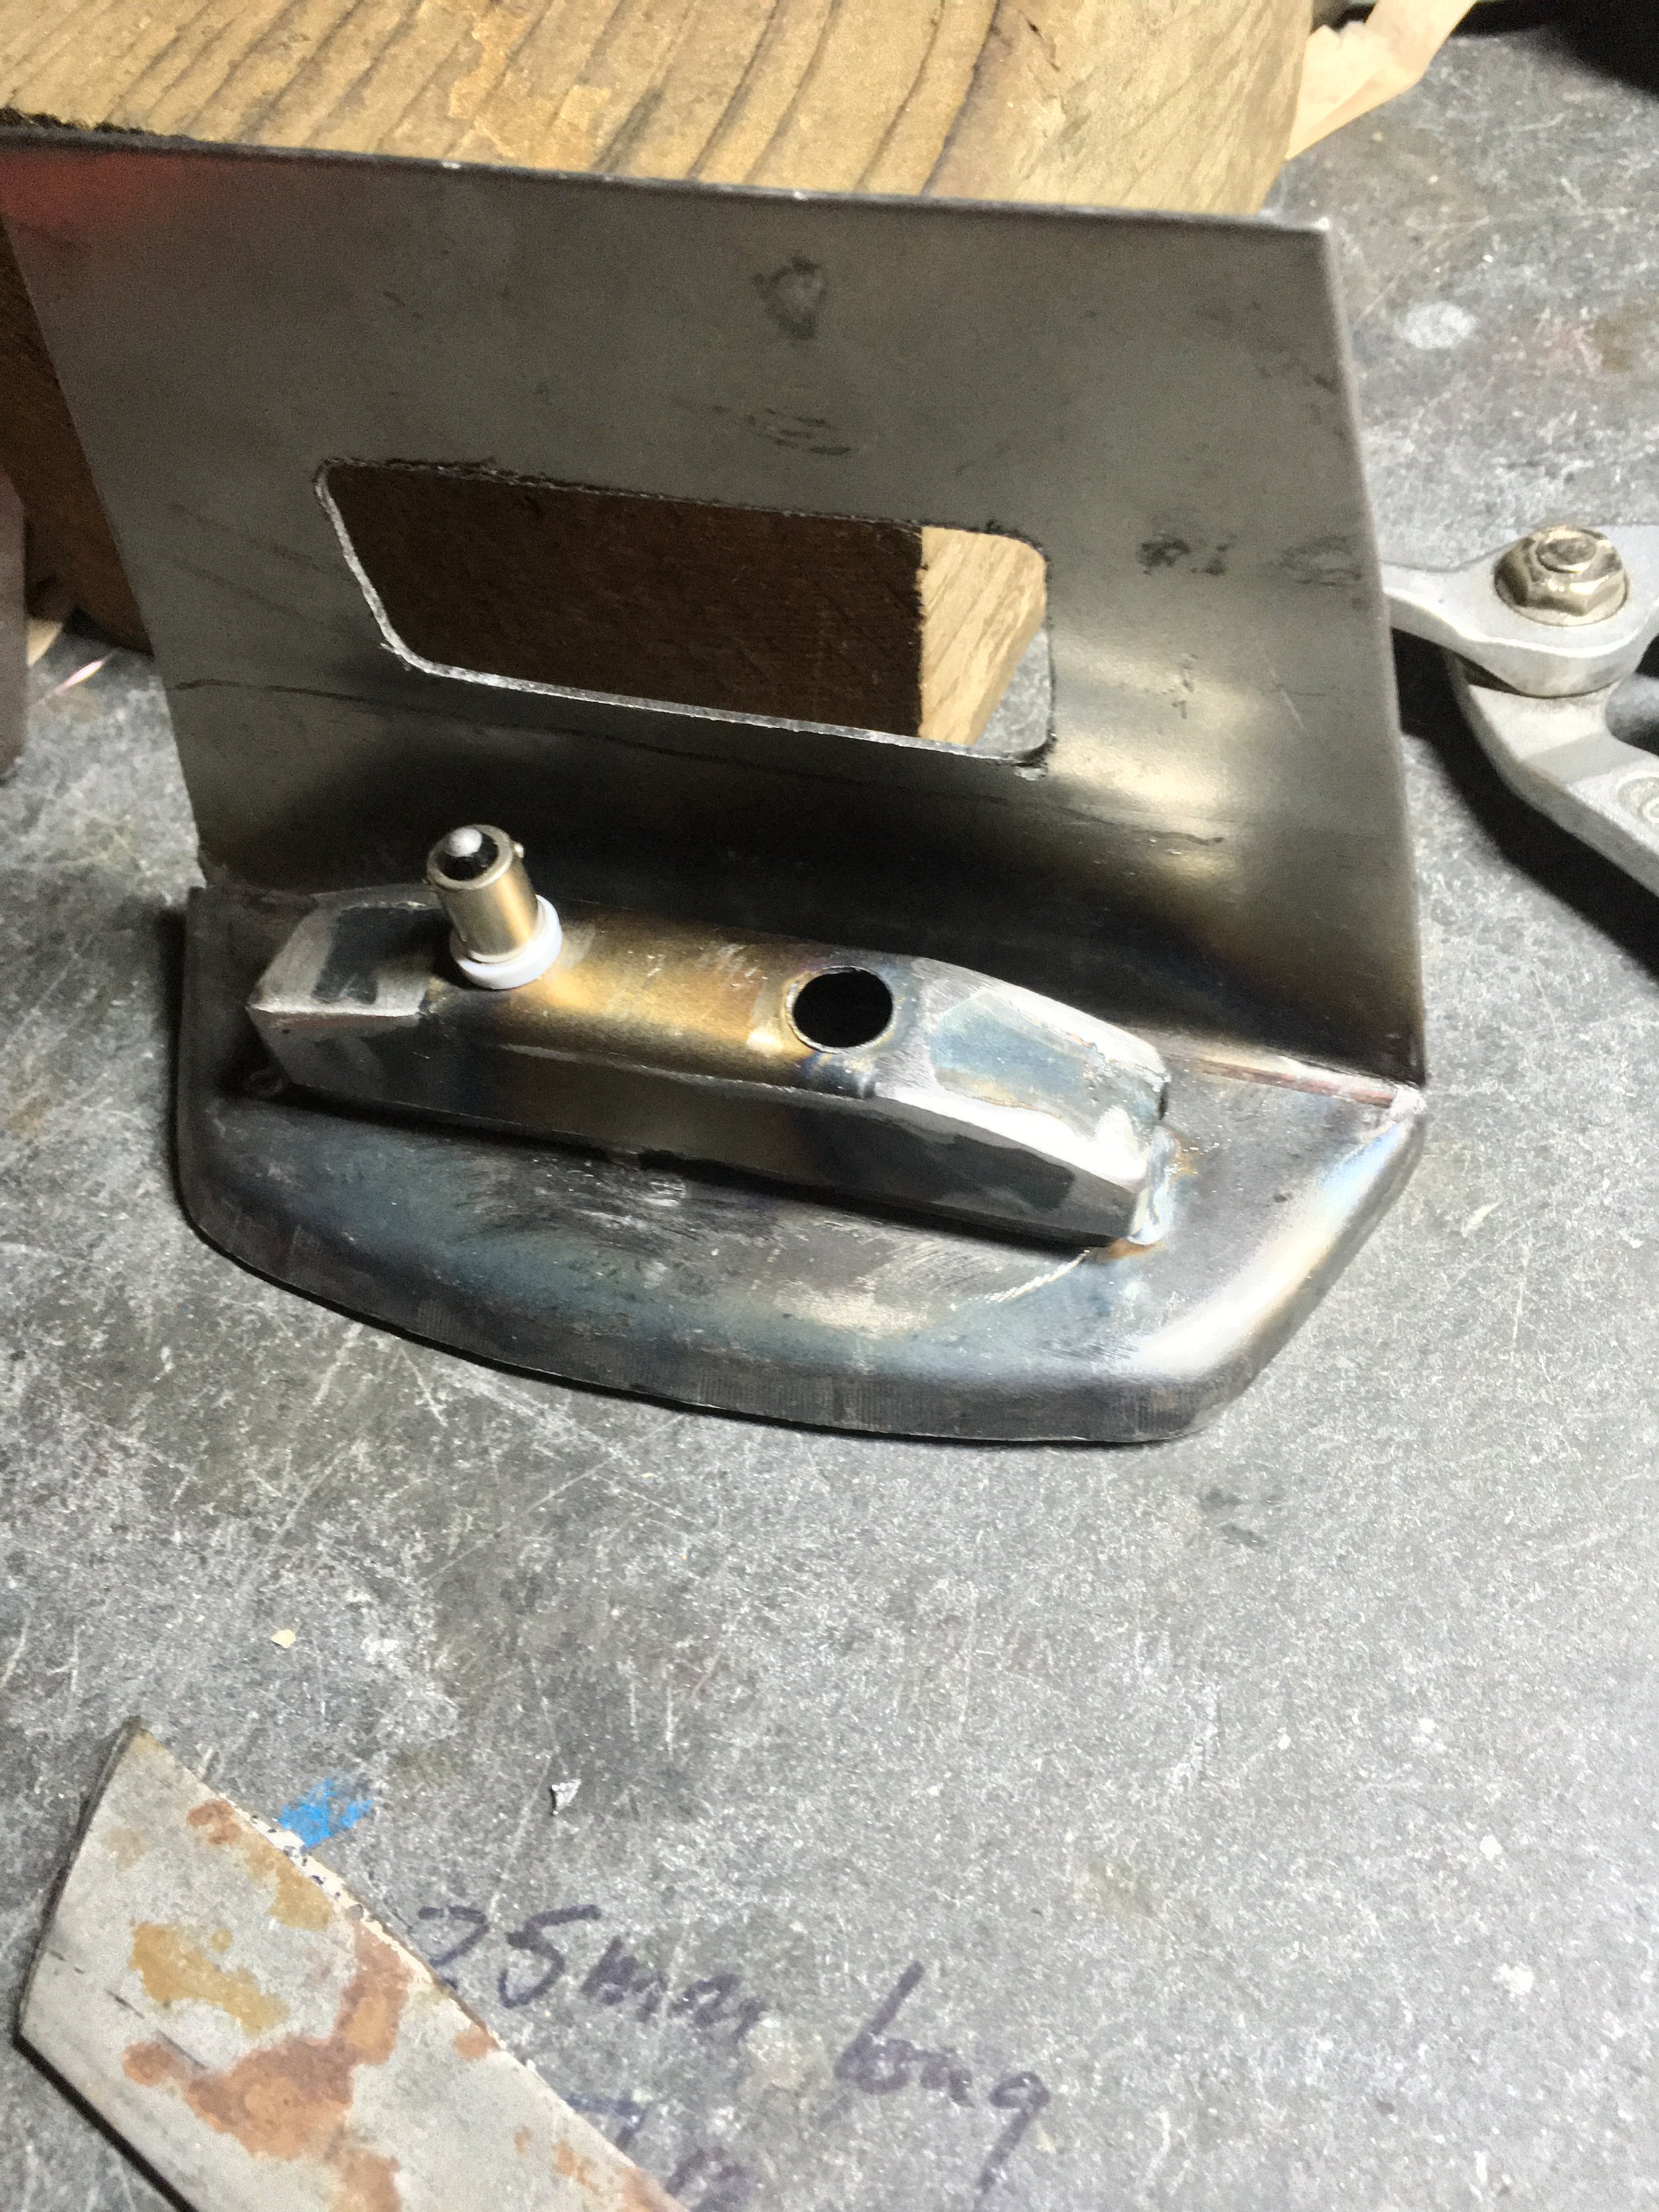
The thumbscrews for the seat are ready for brazing here. They are machined to press fit together with a thick head washer underneath used as the base.

After heating, the parts were brass brazed.

The thumbscrews in place. After chrome plating, they will go nicely with the gas cap.

More rectangles cut into the seat frame and hinge, mostly to lighten things up. Some Honda rubber bumpers fit in the smaller holes toward the rear of the seat frame, that rest on the stock frame tabs like the original seat.

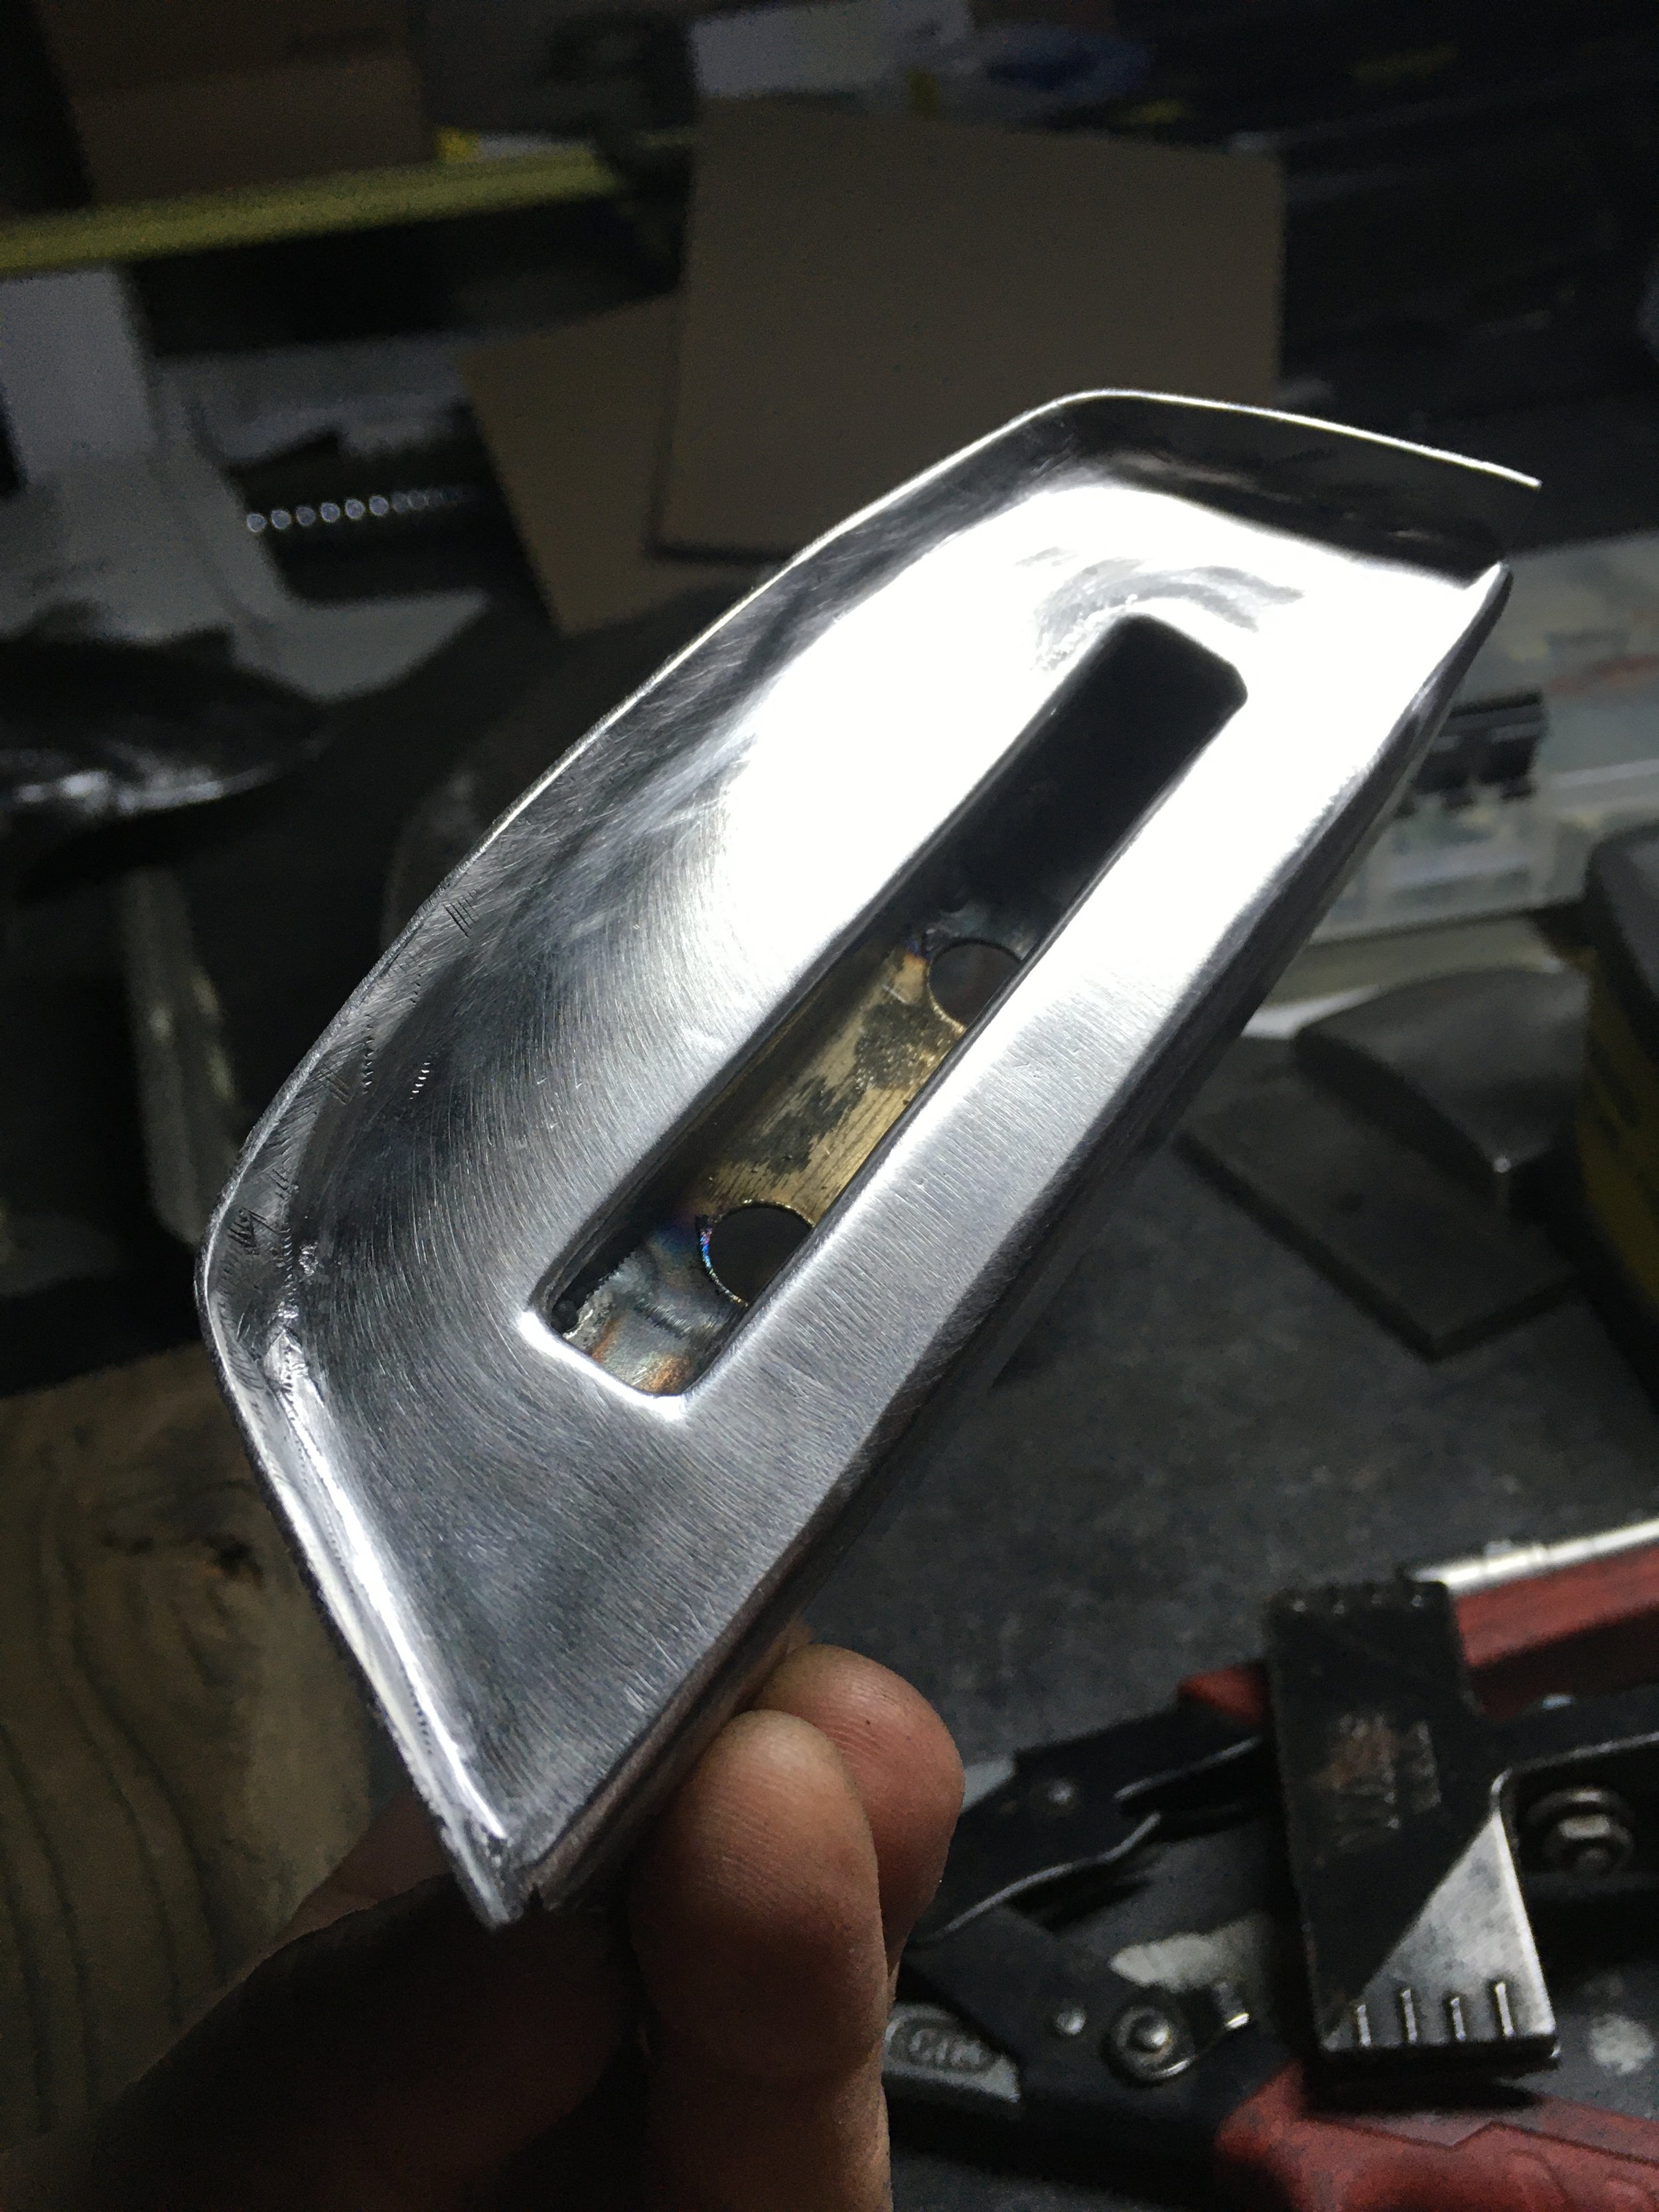
In order to make a uniform recess on the rear seat panel for the tail light, a hammer-form was made.

After the panel was worked on the hammer, form, a second rectangle was added to the backside to hold the brake light lens. This is the snap-on reflector and bulb assembly, and the access hole to reach it once the panel is welded in.

After some clean up, the rear panel is ready to weld to the seat pan.

Simple and clean, and goes perfectly with the front light.

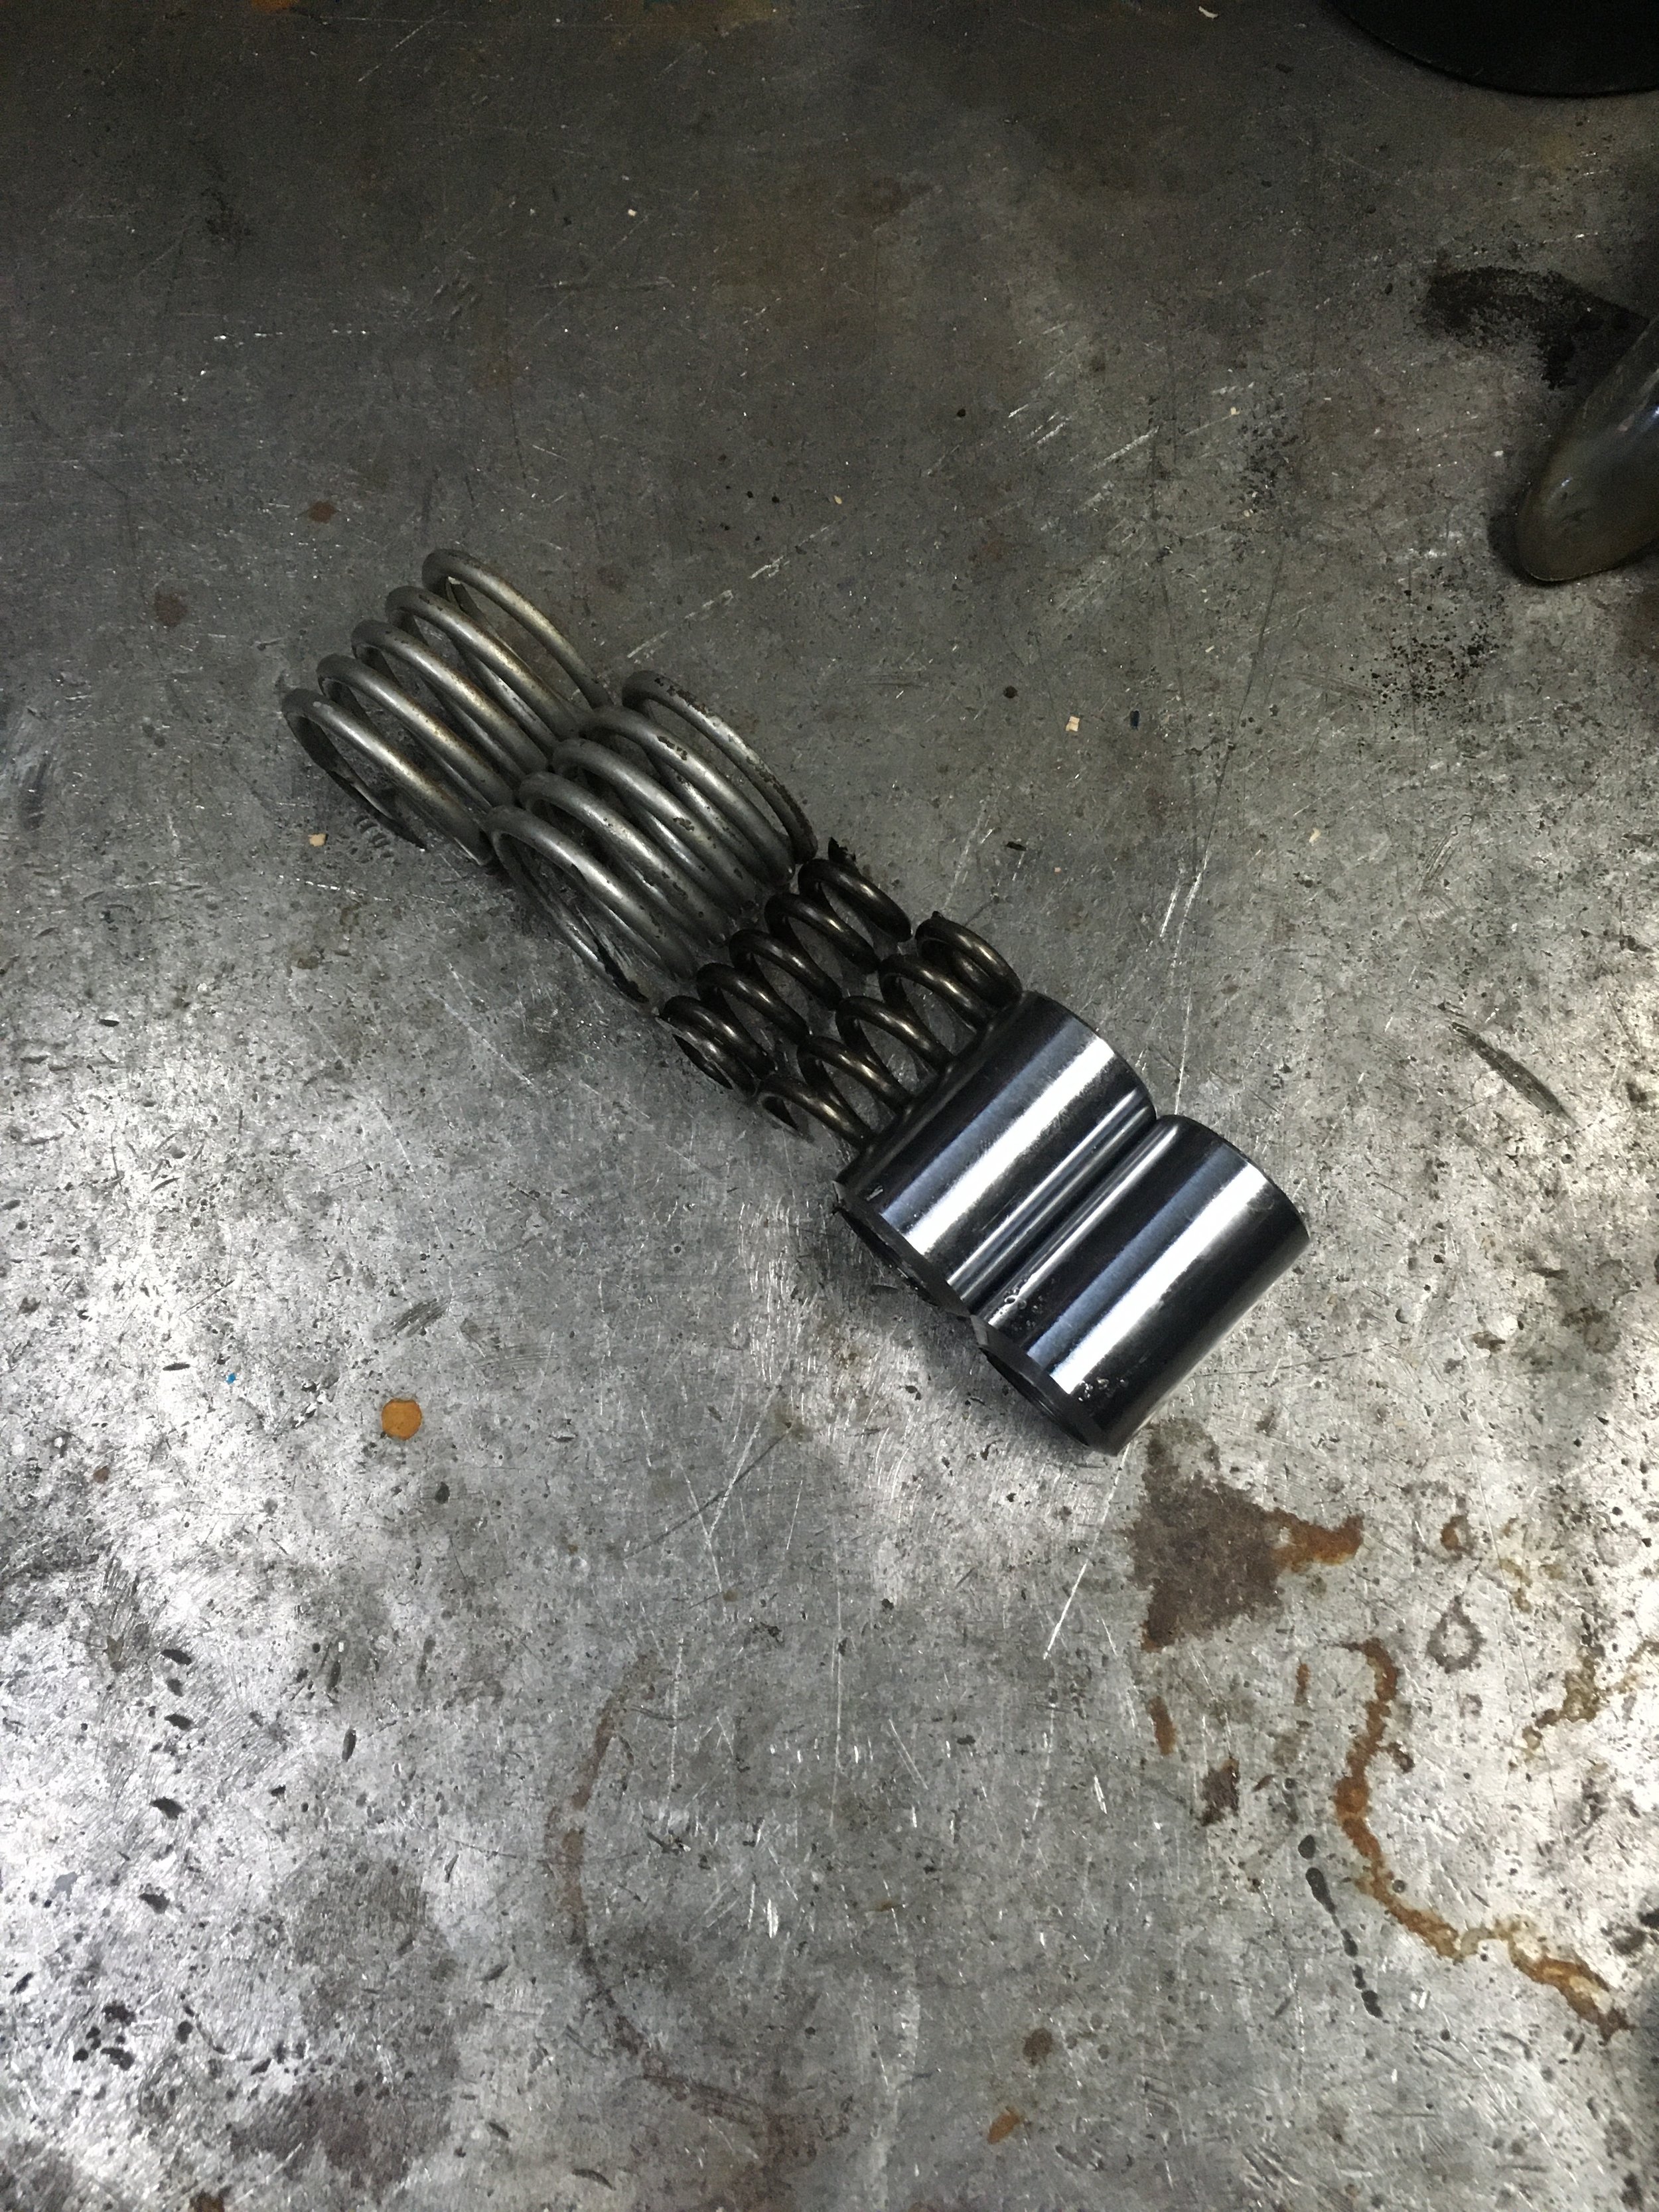
There are inner and outer springs as well as the fork tubes that had to be cut down. The fork tubes had to be re-threaded after they were cut down, for the top screws.

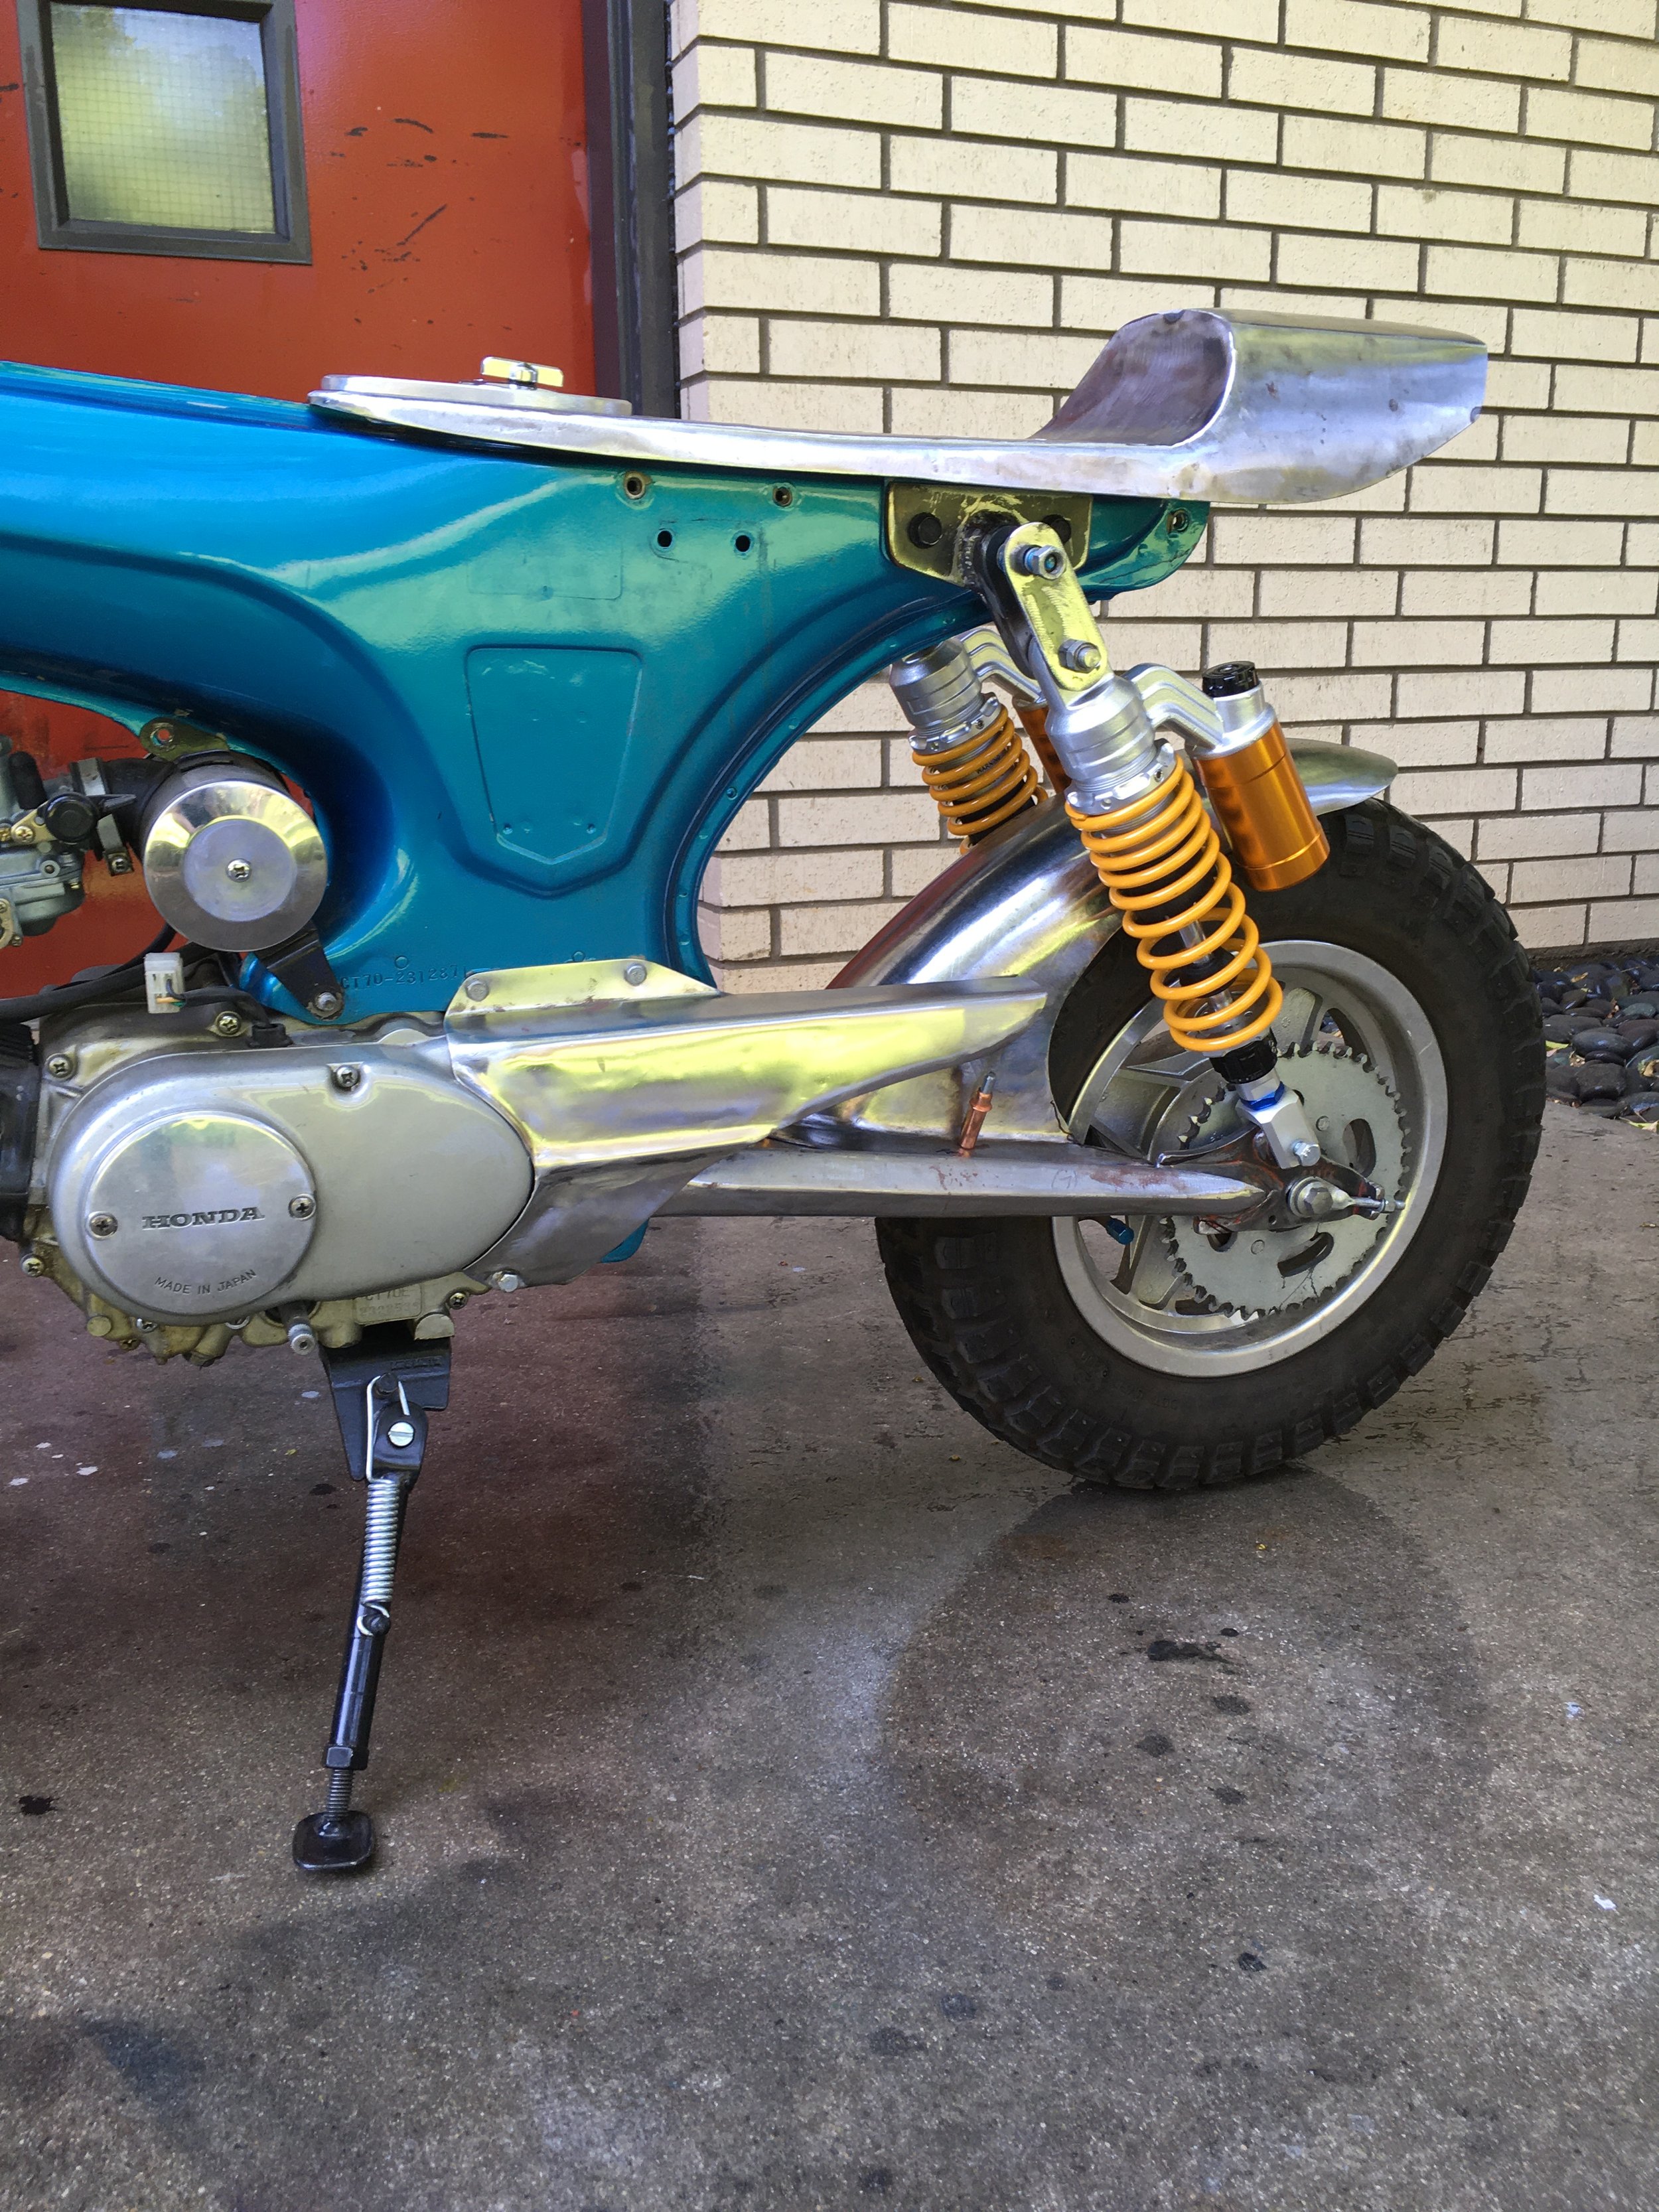
The shock lowering brackets were another part taken from the CT117. They allow the long swingarm to be used without really long shocks to keep the ride height right.

The front forks will have to get some machining on the mounting screw bosses to mount the custom front fender and fork brace. The brace is hidden beneath the fender.

The front fork brace can be seen at the top right. This picture represents the one hundred plus degree days we are experiencing in Texas, and my struggle to keep the sweat off them so they won’t rust.

The 1955 Norton Dominator Norsaki build leaves the shop.

The Norsaki bike has finally been started, heat cycled, and gone to a two-stroke tuner to get the carbs tuned. The airbox cover is out for paint, but the rest of the bike is done. After resurfacing of the cylinder and head mating surfaces, the heads are sealed. She starts easy, and sounds a little raspy, but needs smaller jets to get the top end dialed in. The rest of the post is the photo dump. Enjoy.

An Airbox, Painted body parts, and getting the engine started on the 1955 Norton Norsaki project

Just when you think you are getting close to the end of a build…Some of the details as I sort through an engine that was supposed to be ready to go, add a custom airbox, reassemble the painted bike, and get it all running.

The test rig. A test tank because the pipes have to be removed a few times during the engine break-in. The naked airbox can be seen tucked in there. Once the engine is tuned, and the outer airbox painted and mounted, It will be finished.

First of all, the bike is running. It starts easily, and was taken through six heat cycles, keeping the revs low. Once that was done, it was taken out on a ride to push it a little more. That produced head gasket leakage on all three cylinders. While disassembling the top end, a welding goober was found, apparently burned into the head. Since the sealing surfaces are a little rough, they will get a light resurface, new copper gaskets, and some high-heat silicone on reassembly. Other defects were a lock washer substituted for a sealing washer on one of the head bolts, and a broken piston ring. There was some debris washed down into the middle cylinder and sump that kept the crank from turning completely. Since new head gaskets, head bolt sealing washers, and exhaust gaskets are going in, some ignition points were also ordered. After a check, the ones in the engine are just in spec. When dealing with an unknown engine, it is best to check out the basic stuff. In this particular case, it may be a better idea to just start over on some of this.

After just a couple passes, it is obvious there is slight warpage and leakage by the tell-tale black burn marks. Not too bad for something fifty years old. The welding goober was knocked out with the tip of a three-sided scraper. There is a small divot seen in the lower burn mark.

After resurfacing, the divot is barely visible, and burn marks are gone. The other two heads were given the same treatment.

Amazingly,a Kawasaki S3 airbox was located in one of my parts bins. It was given to me in a load of other parts by a mechanic friend.

The box was cut apart, the mounting ears removed, and welded back together in a more compact configuration. Some mounting brackets and the stock rubber tubing then went on.

The top cover was hammered out in the shop along with the retainer bolt. The air filter element is a generic one.

A late idea added to the build (actually, the rest of the bike was already being painted at the time) was an airbox made from the original Norton oil tank and tool box. They were joined with the Kawasaki airbox made to fit inside, and the tail-end of the expansion chambers passing through a carved-out section on top. The unit may still be split down the middle after paint to make removal easier. The air filter can be changed by taking off the left side cover.

The left side cover was given a frenched-in place for the petcock, which was already passing through this spot.

The body parts lined up, waiting to get to their final spot.

The Lucas light shell and custom parts filling all the holes.

The front fender and bracket in place. Cosentino Engineering upgrades for Norton Roadholder shocks were used to give a more modern ride.

Tail view showing the brake light recess and exhaust pipe cut-out.

Achieving the flat’ straight body line on the seat and tank bottom was a little tricky on the Featherbed frame, requiring some elevation of both to overcome the dip in the center of the frame.

Too bad this lovely view will be obscured by the tank. The removable heat shield under the tank clears the center pipe by just a few millimeters.

More heat mitigation, some woven fiberglass insulation on the pipes under the seat.

Early on in reassembly, the straight tank-seat line can be seen here.

A box to hold a tiny lithium battery is tucked behind the engine. The fuse holder is seen on the side. The electrical system is completely functional. Now if we can only get the rest of the bike the same. As a side note, I was originally recruited for this project to build the seat. That of course led to designing the tank mounting/heat shield system and accompanying frame mods. The electrical system, plumbing, airbox, disassembly and final assembly, and most of all, engine start and tuning were mine by default, and not altogether expected. Not that I mind, as a good puzzle is always appealing to me, just a little out of the order I would have done things in, had I known.

The 1955 Norton Norsaki and 1967 Triumph Mountain Cub builds nearing completion

The 1955 Norton “Norsaki” build, a featherbed frame with a Kawasaki 400 triplets been painted, and assembly will begin shortly. The 1967 Triumph Mountain Cub is assembled and awaiting the oil and gas tanks to return from paint. The seat cover is done on the Norton, and the Cub seat is in the process of being upholstered in the original color scheme.

The seat and strap were done in Napa leather. A stainless thumb screw was carved for the tank strap anchor. Black sheepskin is sewn underneath, where it contacts the tank.

A simple pattern was chosen for the seat cover. Can’t wait to see it on the seat pan. The cover was made by Xtreme Upholstery in Denton, Texas.

The original Kawasaki S3 tach fit perfectly in the Lucas headlight shell, but finding a working one that was also presentable proved difficult. In the search, three seperate units were sourced (one was returned as defective,) and a single unit with a restorable bezel and an intact output shaft was built. There is also a custom face being printed.

The ammeter hole in the Lucas headlight shell needed filling, so this panel with original Lucas jewel indicator lights was machined from aluminum.

A special washer was made to mount the light switch, and another aluminum bezel was made for the ignition switch.

With everything mocked up, the lines are becoming a little more clear. The bike started life as a 1955 Dominator. When designing the custom parts, I tried to keep some of the original feel. The owner of the bike wanted a classic cafe racer style, with a straight tank-seat line, straight bars, and bobbed fenders (the original fenders are quite large and a little heavy.) Even with the cafe styling, the new seat is only slightly shorter than the original, retaining the ability to take a passenger.

Some rear loops for the passenger pegs were made from 7/8” tube. Some old Harley Davidson pegs were the closest match to the rear-sets used in the front. Interestingly, they are made from some minibike handlebars, cut from the pullstart mini put together for Skratch’s Garage (seen in the December 31 post.)

The front fender mounts and lower stay were added to an un-drilled vintage fender. The front hub is said to be a Grimeca, with 4 leading shoe brake pads. It will have some stopping power.

The tail end is looking pretty tight. The large wheel T-nut seen on the left side, and the rest of the wheel hub are from a Vincent Black Lightning, a bike of which only thirty-some odd were made. The parts were found by Big D Cycles, in Dallas, who built up the wheels, shocks and handlebars. They decided to go with the hub to solve the brake/sprocket configuration, and because it was just so cool. There is also a brake panel stay that releases by a spring-loaded slide, making the rear wheel removable without tools.

The seat pan on the 1967 Triumph Mountain Cub was made up. The lower bracket is made from 1/8” flat bar, with an aluminum pan made from .090 sheet. Mobtown Mike Smith will be taking care of it.

I like this technique for concealing wires under the fender. A brass tube connected between the entrance and exit holes, with small plates on each end that utilize the existing fender mounting holes to keep it in place.

The tail light unit was made from an old cymbal, a busted minibike tail light lens, and a brass plumbing fixture. The design was inspired by the iconic Sparto “Limp dick” tail light mount that was on the original bike. With the bobbed fender, there was little room for the original, and it looked out of place. This one is scaled down, and crosses over the rear frame loop.

Such a beautiful engine, designed by Edward Turner. In this picture, the engine is awaiting the points assembly, prior to installation.

The timing degree wheel along with the spark plug gauge, feeler gauge, and a test light are all you need to time the engine. I think the JapaneseHonda system is a lot less complicated, and more precise.

Some of the grief of trying to rebuild a vintage foreign bike. This is a picture of the muffler sent to me after a nearly four month wait. Obviously the wrong one, it cannot be made to fit, and looks to be made for a dual low-pipe set up. Of course the vendor is unresponsive to emails. When it arrived, the muffler was in a plastic bag, with more than a little bit of rusty water inside the bag, covering the muffler. A sign of attention to detail and competence…not!

1967 Triumph Mountain Cub restoration update

Starting to assemble the 1967 Triumph Mountain Cub. Every nut, bolt, and body part has been taken down and addressed aside from the original tank paint. Still waiting on parts to get the engine back together. The wheels are another area of concern. The front fender needs to be worked out. Small touches like a light weight tail light assembly and solo seat are also planned.

Getting a little farther into the assembly. The rear wheel has been a headache. The Triumph Tiger Cub is a little harder to figure some of the part numbers if you do not know the actual model you are dealing with. The Mountain Cub variety is even harder to figure out because there is not a parts catalogue specific to it (at least that I can find.) Perhaps this is because the model was produced at the very end of the Tiger Cub run, or because it was a US only model, but whatever the reason, there is some guessing that I have had to do. The bike came with a WM-3 wide wheel. After checking the latest Sports-model parts catalogue from 1965, there were two different wheel possibilities, but only one for a WM-3 width. After purchasing that specific wheel rim and lacing it multiple times, there was no way to get the spokes to fit correctly. After more research and hunting, the correct rim turned out to be the WM-2 width one. It appears the rims of both wheels were switched out at some point, and the WM-3 rim was substituted. Fortunately the wider rim can be used elsewhere, as it fits 63-70 650’s and other models. The front rim spoke nipples were way too small for the rim holes, and were swimming around in them. A new set of front and back stainless rims and spokes is on its way.

After the body work, the tank looks nice and smooth. It was primed and painted with rattle can enamel.

Nothing like fresh finishes on everything. Still not decided on the tank paint, but that decision can wait till the front fender is made, as it will probably get some paint as well. All the switches were cleaned and greased, connections were freshened up, and the wiring harness was restored. Some new sheathing and some missing connectors were replaced. The handlebar switches were also restored, and the wiring hidden inside the bars. A mounting bracket for the horn is all but invisible hidden behind the headlight. It uses the handlebar mount bolts to secure it. Since the original bracket was absent, and pictures showing it look like it was made for a different horn than the one with the bike, I just made something that worked in the space allowed. The wiring harness was modified to have a single sheath of five wires passing from under the tank to the headlight. Usually, there are connectors from the horn and kill switch that pass separately along side the main wiring harness. Instead, the ignition wire was added to the harness bundle, and routed to the headlight, where the horn and kill switch connections were made.

This tray was packed with hardware. As it dwindles in size, it makes me happier and happier.

Awaiting an oil level decal, and a final coat of clear on the oil tank. The air filter assembly and rear brake plate are ready to go. The air cleaner is another item that was different on the multiple Tiger Cub models. This one was also used on some pre-unit bikes. There are at least three different types used, as far as I can tell.

Only a few of the black parts were painted: the headlight bucket, horn bracket, speedo mount, and oil tank. The powder coating was done by Triad Product finishing in Lewisville, Texas, and is the best job ever! Not just hyperbole, the masking was impeccable, there were no runs, sags or bare spots, and the thickness was just right. In the past, I have used the powder coating as a base coat, and cleared over it, but this job was so good there is no need. The difference between the powder and painted parts is indiscernible.

An example of the wiring harness condition. Poor connections were cleaned, and the wire ends were freshened and tinned with solder. Dielectric grease was used on unexposed terminals as well as the bullet wire connectors on the wiring harness.

The wheel assemblies were taken down completely. The hubs and rear brake plate were powder coated, all the bearings were replaced, and the fresh hardware to finish it off.

The thirty-over piston is in place with new gaskets. Still waiting on the head.

A transmission main shaft bushing is back ordered from the UK, and the right side covers can’t be put on without it. The rest of the engine block is assembled. The clutch hub bearings and rubber cushions were replaced. The primary drive installation is waiting on the transmission assembly.

The crank shaft assembly was pressed together and then trued on a lathe. The roller bearing on the big end of the connecting rod ended up getting the nod after two successesive bronze bearings gave too much side play.

Making a rubber washer for the high beam indicator light, using an arbor press and punches.

And finally. My Buddy, Clinton rode up from Dallas, trying to get some miles on a fresh engine rebuild on his Norton Commando 850. Such a beautiful bike!

Rebuilding Honda Z50 Carburetors, and a pull start minibike for Skratch's Garage.

Two Honda 1970 Z50 minibikes were in need of a carburetor. With as many minis as there are around here, it pays to have one ready. Eight original carbs were worked over, with six of them completed, and a couple still needing parts.

This is a typical before picture. The choke assembly and any other steel parts have been stripped from the carb and sent out for zinc plating. The carb body is cleaned in an ultrasonic cleaner, with hot degreaser. Everything gets blown out, and put back together with new seals and gaskets. Some of these carbs were incomplete, missing floats, slides and fuel hose spigots. Replacements will be found, or they will stay as parts carbs.

All the parts ready for rebuild. The paper gaskets were replaced with new, and the nylon and rubber seals were replaced. The original paper gaskets are in remarkable shape for being over fifty years old, but the nylon and rubber sealing washers are cracked and need replaced..

The original plastic sealing washer on the choke lever is one of the impossible parts to find. Pictures of the part online look like it is made of natural nylon. The used washers, seen on the left, are somewhat puckered on the edges, suggesting they have shrunk after all the years, heat, and fuel. A piece of nylon rod was turned down on a lathe to a size slightly larger than the largest original one I could find (there were a total of ten measured to get the size.) Individual plugs were cut from that rod, with a 7/64” hole drilled in the center.

Getting the keyed opening in the nylon turned out to be easier than anticipated. Drilling the center hole is easy enough, but getting the exact dimensions needed to make for a tight seal around the shaft of the choke lever took a little figuring. A piece of steel rod slightly smaller than the shaft was ground down on the sides to the same dimensions as the original shaft. The end of the shaft was tapered to help it center on the pilot hole in the center of the nylon plug. After heating to cherry red, the rod is plunged through the plug until it pops out the other side( I did this over a slightly open vise, that allowed the rod end to poke through the opening.) After a quick quench in water, the nylon is solid and the flashing can be trimmed off with a sharp blade. Keeping the plug on the rod while trimming makes for more crisp edges.

The nylon washer on the left was the largest original I could find. The one on the right is one of the new ones.

Small sections of Honda tubing were cut to replace the rubber seal on the shaft, another part that is impossible to find in new shape.

Part of the way through the process. The bodies of the carbs were not refinished aside from the ultrasound cleaning. Some still had a fairly good original surface, but most were in some state of oxidation. Vapor honing gives a beautiful finish, that looks even better than original. That may be the way in the future, but for now, this will do.

The intake manifolds were bead blasted, and the studs and nuts were re-plated. New O-rings were used for the fuel drain needle, and manifold.

An finally… This DoodleBug minibike came from the same family as the 1967 Triumph Mountain Cub. It was hanging around the shop over at Skratch’s Garage in Haltom City, Texas, and I took it to do some mods and maintenance. It is being given a little refresh, with new bars, a mini Whizzer style tank, straight exhaust pipe, tires, chain, cables, and hand controls. She is a runner and rider, with a pretty mild engine. There may be an engine upgrade in the future…

The 1967 Triumph Mountain Cub Restoration Begins.

The Mountain Cub was broken down for restoration. Every part has been disassembled, cleaned, and inspected. New parts are trickling in. Mostly in a scattered state for now, with hardware out for cadmium plating, the head getting a rebuild, and the frame parts out for powder coating. A few aluminum parts have been polished, and dents were removed from the oil tank. There is always a learning process getting to know a particular bike. There is a lot of information available on the early years of the Cub, and more early used parts can be found as well. The information on the last two years of production (1966,1967) is scant, and things like the primary side cover are proving hard to find in good shape. The T20M Mountain Cub engine was produced during that last two years of the Tiger Cub run. There was a significant engine re-design in 1964 where the engine cases, crank, and side covers were modified enough that they are not interchangeable with later models. Other late model changes included a different connecting rod with a larger crank bearing and pin, something I found out disassembling the engine, as explained below.

The rust on the wheel hub was superficial, without any pitting, and cleaned up nicely after ultrasound degreasing and bead blasting. New bearings will go into the hub rebuild.

The frame parts all disassembled and degreased, awaiting bead blasting. Since acquiring an ultrasonic cleaner, the parts are cleaned in a water-based degreaser, opposed to the kerosene parts cleaner used in the past. The results are superior, and the process is less labor intensive.

The bead blasting is done, and any stubborn paint will be scraped or wire-brushed away prior to powder coating.

The factory brass-brazed frame joints are one of the cool things about Triumph frames. I have seen film of frames at the Meriden Triumph factory, where the frames are lying in a large bed of coals, being heated hot enough to apply the brass right there. While it seems a little crude, it is probably a pretty efficient way to get the job done. The frame was actually in very nice shape, without any significant alteration or distortion.

The crankshaft was disassembled, and it received a big-end roller-bearing conversion at some point. I have a new stock bearing and crank pin, but after disassembly, it seems the connecting rod is an early model with a small big-end bearing. A new rod has been ordered, with the bigger bearing found on the 1966-1967 engines. Given the copious smoke this engine produced when running, any non-stock parts are suspect as contributors, hence the conversion back to stock.

The sludge trap on Triumph cranks has always been a source of frustration. It is quite common for them to be badly chewed-up from previous removal (or perhaps, only attempts.) This one was no exception, and had to be drilled out. A 1/2” drill bit left just enough room to preserve the threads. This is the last little bit of the plug, wrapped around the drill bit. Fortunately, the threads were untouched during the process. Baxter Cycles had the new sludge trap replacement.

A couple of dents on the oil tank needed to be knocked out.

Some mandrels pressing the dents from inside of the tank through the filler hole, and a stud-gun to work out the rest, and its close enough for paint.

The replacement side cover was sanded and polished out. The case halves are clean, and all bushings and bearings have been replaced.

A new Morgo oil pump went in.Extra time was spent making sure that all the oil passages were super clean in the engine block, crank, and tubing, and especially the oil tank. There are many stories circulating amongst British bike owners about crankshafts and cams ruined after a rebuild because of a a dirty tank or sludge trap.

I left the head with Big D Cycles in Dallas, Texas, for new valve guides and valves. Once again, with everything else getting restored, and all the smoke it produced, it seems like it has to be done. This is the first time using an ultrasonic cleaner with a heavy-duty degreaser to clean parts. The finish was in surprisingly good shape on the engine center cases, given all the oxidation and wear on the side covers. There is a skid plate that goes on the bottom of the frame, and evidently it does a good job protecting the bottom (the thick layer of grease probably didn’t hurt either.) The new main bearings for the crank and tranny are in place, along with all the bronze bushings.

It’s a tedious process cleaning and working over the hardware prior to cadmium plating, but using the original hardware makes a big difference in the final product. Everything gets ultrasonic cleaning, degreasing, and wire brushing. Threads are chased and bends and nicks are repaired as well as possible Though there were some missing and incorrect pieces of hardware on the bike, a majority of the parts were there and in decent condition. The engine cheese-head Filson case screws had been boogered up a little, and were replaced with NOS ones. The heads of those original screws get hammered out enough to use again, but are still irregular enough to keep them out of this build. After all the prep, Texas Precision Plating in Garland, Texas does the cadmium plating.

The passenger pegs were removed by a previous owner, so the brackets were trimmed off to finish the job. The lug for the kickstand was kept, and a dome from the rear of a Norton feathered frame finishes off the end of the tube. There will be a solo seat on this bike, so the rear pegs are not needed. A new location for the brake light switch will have to be worked out. The location for the switch down low on the frame seemed a little vulnerable anyway, and could benefit from relocation.

The original white steel fender on the bottom, and an aluminum one to replace it. The fender was a clearance model from Lowbrow, that was sitting on the shelf. A little hammering and English wheel, and the crown was raised to more closely match the deep original. When the bike starts to go back together, the plan is to make a custom aluminum front fender as well. The modifications to the bike are all reversible. The old seat, fenders and tail light will be preserved should anyone want to restore it to original in the future.

The splines on the gear shift shaft were a little hammered. They worked, but look like a future failure waiting to happen. Baxter Cycle had a replacement for three bills, seen on the right. I was thinking a single-cylinder restoration might be a little less expensive than a twin or triple, but so far, that is not the case. A new shifter pedal will be used to keep everything as tight as possible.

New fork uppers are going on the bike along with new chrome locking collars, seals, gaiters, and bronze bushings. The restrictor cones are also being replaced, leaving the fork lowers, upper beauty rings, and tripletrees as the only original parts. Aside from the engine, suspension is one of the areas that I like to get worked out as well as possible, as it make so much difference in handling and comfort, and ultimately, safety.

1967 Triumph Mountain Cub in the shop for a revival.

The Triumph Mountain Cub was a late sixties iteration of the Tiger Cub. The Tiger Cub, with 200cc’s was dubbed the “Baby Bonneville,” and was well received because it stayed within the 250cc limit for learners permits in England. It was produced from 1954-1968, with street or off road versions. The Mountain Cub was a US only model, produced in 1967 and 1968, intended to compete with small Japanese bikes in the consumer market. It was set up for street or off road, with some models including aluminum fenders, trial tires, tall bars, and stripped down so much there was no side or center stand. This particular Cub has MX-style high handlebars, knobby rear tire, folding pegs, deleted tach, passenger pegs and center stand, a high pipe, battery-less ignition, and a light front wheel with the small hub and an alloy shouldered rim. Not a bad start on an off-road set-up. The front tire, long seat, lights, and steel fenders, however, are more suited for street riding. It is not clear what parts of the bike are original factory parts, or those added by previous owners. The first order of business is to return the engine to original running condition.

Here it is, shortly after being pulled from the barn. A 1967 Triumph Mountain Cub motorcycle in Grenadier Red and White. This was a legacy bike, found by Skratch at Skratch’s Garage in Haltom City, Texas. The daughter of the owner wanted it to go to someone who was going to take care of it rather than flip it. That will certainly be the case. She asked for a chance to ride it again, once running. That is surely the intention, but as bad as it smokes, it needs tear-down and rebuild before it can be ridden.

A number of changes had been made to the bike by the previous owner(s.) The exhaust had a section of flex pipe welded in the center, there were some dents, cracks, custom paint, and copious quantities of oil inside the muffler. The oil was from the engine, which smoked furiously, once started. The tank and carb cleaning were enough to revive it, but the smoking was bad enough I only kept it running a few minutes for fear of engine damage. The engine was wet-sumped, with a quart of the 1.5 liter capacity sitting in the engine. Even with it removed, the engine did no better.

A couple of deep gouges were found on the side of the cylinder bore. A new .030 over piston and rings is on the way. It was easy to find higher compression (9:1) domed pistons, but the flat-top 7:1 CR pistons proved a little harder to find. Because these engines have a reputation for running hot, the lower compression piston was chosen.

Other creative changes made by a previous owner include remounting the speedo and horn on some hardware store brackets. I have my doubts this set-up was used, as the odometer is still set to zero. The speedo cable had been re-routed through the frame to make the cable reach, with a number of bends along the way. It has since been returned to the factory location along the bottom of the engine. The original 415 chain was hanging over the handlebars. A new Pro-Taper gold MX chain was purchased to replace it. New fork components are being gathered in preparations for a total rebuild.

Mmmm. Barn fresh. Mud dauber nests were fond in a number of locations on the bike. Pretty common in Texas.

Hard to believe a fuel system clean and some fresh oil is all it needed to run. The Lucas ET ignition does not require a battery, and starts the bike easily. The lights were operational, as are the brakes and clutch. The scavenging side of the oil system appears to be dry, with no significant oil being seen in the rockers. A new Morgo pump has been ordered to replace the original. All the passages and oil tank will be checked and cleaned.

The right side engine cover has a significant chunk out of the edge of the clutch adjuster inspection hole. A used one has been purchased to replace it.

The frames and tank on these models are unusual in the way the frame slopes down from the steering tube, and uses the tank as a stressed member. There are steel bars running through the inside of the tank, that have the external tank mounting tabs on each end, which bolt to the frame. This bike was designed by Edward Turner, accounting for some of the Bonneville-like styling.

After a bit of elbow great and some wrenching, the speedo is back to the original location, and the bars are a bit cleaner. The tank has been cleaned inside and out at this point, and is in good shape, overall. It will be repainted at some point. A new set of knee pads are on order. The front brake cable was repaired, and is operational now. The wiring for the kill switch and horn needs to be addressed, but there is likely to be some restoration done on the handlebars first.

As cool as it looks at present, some custom touches are planned for the rebuild. The engine will be left mostly stock. The original seat is rock-hard and the plan is a shorter trials-type seat to replace it. The steel fenders may also get traded out for some alloy models, along with a smaller tail light assembly. The wheels will be rebuilt with rubber more suited for off road riding, and perhaps a rear alloy rim to match the front.

A new chrome plated exhaust system is on its way from England. Even though there were thoughts of just get the bike running, and leave it funky, there are enough things wrong with it that it has to go.

Just the clean-up and re-mounting the speedo return some of that classic Triumph styling.

I read that Gary Nixon won short-course races on a cub. Not planning to race this one, but a lighter race style looks great on this bike.

A skid plate was found online to replace the original one that was missing. Wear marks on the the oil feed pipes that rub the skidplate brackets indicate the bike was fitted with a skid plate previously.

Seems I can’t get away from UK brands. My buddy Peter, who has done the studio photos of my bikes, needed help on his 1979 MGB. The clutch had blown, and needed replacement. Here, I am feeling proud of getting the left motor mount on in ten minutes, after youtube videos said steering shaft and the whole rack and pinion rack needed to be removed to do the job ( it does not.) A lot of well-meaning people on there telling you how to get the job done like a total bung-hole. The solution is a slim 9/16” wrench with the nut and lock washer taped to it with gaff tape. The big flat washer that goes on before the nut and locker has to be put in place behind the mount first, but is easy to put in place because of the long slot the bolt passes through makes it easy to see and manipulate. The slim wrench and nut slipping by the shaft holds the flat washer in place