• THE CONTACT
  • THE BLOG
  • THE BIKES
  • THE ABOUT
  • THE PROCESS
Menu

DAVMOMOTO

CUSTOM METAL
  • THE CONTACT
  • THE BLOG
  • THE BIKES
  • THE ABOUT
  • THE PROCESS
Making a monoshock mount for the 1978 Honda CB750. This brace made from 1/8” and 1/4” steel plate was the solution I came up with. The upper mount needs to be fairly low, and room for the shock reservoir needed to be made, limiting where and how the…

Making a monoshock mount for the 1978 Honda CB750. This brace made from 1/8” and 1/4” steel plate was the solution I came up with. The upper mount needs to be fairly low, and room for the shock reservoir needed to be made, limiting where and how the brace could be mounted.

1978 Honda CB750 monoshock mount, 1993 H-D FXR update, mandrel making.

January 22, 2019
There are more pieces that will go on to strengthen the brace, forming a complete box. The attachment points on both frame tubes should spread out the pulling forces and also give the brace the leverage it needs.

There are more pieces that will go on to strengthen the brace, forming a complete box. The attachment points on both frame tubes should spread out the pulling forces and also give the brace the leverage it needs.

Decent welds. Too bad they are inside the brace where they will never be seen.

Decent welds. Too bad they are inside the brace where they will never be seen.

The frame and oil tank for the 1993 Harley Davidson FXR custom build came in from England. Custom built by Jeremy “Briz” Witt of CCD, it uses the Harley FXR motor/tranny mounts, while giving the appearance of a Harley Softail frame. He has worked ou…

The frame and oil tank for the 1993 Harley Davidson FXR custom build came in from England. Custom built by Jeremy “Briz” Witt of CCD, it uses the Harley FXR motor/tranny mounts, while giving the appearance of a Harley Softail frame. He has worked out the geometry so that the motor mounts do not get trashed by swingarm flex.

The work on this frame is superb, with beautiful TIG welded joint. CCD will do any rake, stretch or swingarm width you want at no extra charge.

The work on this frame is superb, with beautiful TIG welded joint. CCD will do any rake, stretch or swingarm width you want at no extra charge.

The frame came with an MSO (Manufacturer’s Statement of Origination) and a VIN stamp, so it should be easy to register. The swingarm uses spherical bearings and is as beefy as the rest of the frame.

The frame came with an MSO (Manufacturer’s Statement of Origination) and a VIN stamp, so it should be easy to register. The swingarm uses spherical bearings and is as beefy as the rest of the frame.

One last thing. While doing some deep cleaning around here, I came upon a segment of an old Honda ATC70 axle that was rusted and nasty, with a long sleeve covering it and rusted in place. Just like all the crap I save, it has to be proven useful at …

One last thing. While doing some deep cleaning around here, I came upon a segment of an old Honda ATC70 axle that was rusted and nasty, with a long sleeve covering it and rusted in place. Just like all the crap I save, it has to be proven useful at some time or it is just crap, so…This is the product of some time with the grinder and lathe. Made entirely from scrap, this mandrel will be used in metal forming. Prior to this, I would clamp pieces of rod in the vise, which was less than ideal.

The second mandrel in the background was made from a piece of the same axle.

The second mandrel in the background was made from a piece of the same axle.

A reminder of why I will be limiting bike revivals and repairs… The combination of vacuum carbs, pod filters, and an unknown electrical system gremlin had the engine idling erratically, with no rhyme or reason. 55 years of wear and tear, neglect, an…

A reminder of why I will be limiting bike revivals and repairs… The combination of vacuum carbs, pod filters, and an unknown electrical system gremlin had the engine idling erratically, with no rhyme or reason. 55 years of wear and tear, neglect, and half-assed repairs can make for quite a puzzle. Getting a new set of Mikuni carbs, intakes and filters made the problem better, but the idle was still not right.

1965 Honda CB450 Mikuni conversion, 1978 CB750 Tank mods and repairs,Electrical Gremlins.

January 18, 2019
Finally found that the c-clip and washer were absent from the post that holds one of the advance mechanism weights, allowing the weight to wander along the shaft, and potentially binding. The clip and washer from a used points set fit perfectly, and…

Finally found that the c-clip and washer were absent from the post that holds one of the advance mechanism weights, allowing the weight to wander along the shaft, and potentially binding. The clip and washer from a used points set fit perfectly, and greatly reduced the idle problem. Another thing that may have helped was cleaning the rust from the pivot shafts and applying some dilectric grease. There were also some poorly done wire splices and a crack that got some solder and heat shrink.

Still pretty rough. A lot of things could be done to make it more correct, but where do you stop? The owner was after a reliable rider, so the roughness allows you to ride with some abandon. The Mikuni 32mm carbs came from Dime City Cycles in a comp…

Still pretty rough. A lot of things could be done to make it more correct, but where do you stop? The owner was after a reliable rider, so the roughness allows you to ride with some abandon. The Mikuni 32mm carbs came from Dime City Cycles in a complete kit that had intakes, carbs, filters, and cables. A good bit of trimming was necessary to make the stock covers fit. The bike had an oozing dent in the magneto cover and the twisted shift pedal that went with it that was repaired by a used replacement cover and some heating and bending on the shifter.

What hey call “a twenty footer.” Looks pretty good from twenty feet.

What hey call “a twenty footer.” Looks pretty good from twenty feet.

There were some shorty headers with some heinous welds on them when the bike arrived at the shop that were swapped out for a set of used ones. I don’t know how it sounded before, but they sound like a proper Honda now.

There were some shorty headers with some heinous welds on them when the bike arrived at the shop that were swapped out for a set of used ones. I don’t know how it sounded before, but they sound like a proper Honda now.

On Calvin’s 1978 Honda CB750 conversion, new swingarm bushings were machined from DOM steel tube, and some work was done on the tank. The end of the tank tunnel needed to be covered, or the seat pad needs to extend upward to cover it. The seat risin…

On Calvin’s 1978 Honda CB750 conversion, new swingarm bushings were machined from DOM steel tube, and some work was done on the tank. The end of the tank tunnel needed to be covered, or the seat pad needs to extend upward to cover it. The seat rising up did not sound like a good look for the Cafe seat, so a metal cover was the solution.

A thin steel cover was welded in extending the tank character lines as well. The tank edge was heated and bent downward in line with the new panel, and then welded only on the outermost edge of the tank’s pinch welded seam, to keep from having to we…

A thin steel cover was welded in extending the tank character lines as well. The tank edge was heated and bent downward in line with the new panel, and then welded only on the outermost edge of the tank’s pinch welded seam, to keep from having to weld the tank skin directly.

A soft dent in the tank got some attention. This is the before. Looks like someone started to work on it and gave up. Probably best they did…I have seen one inch Bondo before.

A soft dent in the tank got some attention. This is the before. Looks like someone started to work on it and gave up. Probably best they did…I have seen one inch Bondo before.

IMG_3947.JPG

After some studs were welded on allowing the dent to be popped out with a slide hammer. Because the paint had been ground off and left to rust, some suspicious spots looking like possible pin holes were present. The inner tank is extremely rusty and only after cleaning will the extent of the damage be known, but an epoxy liner is going to probably be a good idea.

With all the other brass pieces on the Freebird 57 Triumph project, a handmade brass gas cap should fit in just fine. Trying to evoke an earlier era in motorcycle building. with all the brass touches. I have always loved the mechanical intricacies o…

With all the other brass pieces on the Freebird 57 Triumph project, a handmade brass gas cap should fit in just fine. Trying to evoke an earlier era in motorcycle building. with all the brass touches. I have always loved the mechanical intricacies of early twentieth century machines, and the look of brass on them. There is a warmth and vintage feeling it gives, and a richness of color and patinas

Working on the 1957 Triumph Freebird gas cap.

January 13, 2019
Just like all the other pieces, this one was pounded out of flat .050 sheet using traditional hand tools and techniques. This shows part of the raising process called “bottlecapping” ( for obvious reasons.) It is part of the shrinking that is done t…

Just like all the other pieces, this one was pounded out of flat .050 sheet using traditional hand tools and techniques. This shows part of the raising process called “bottlecapping” ( for obvious reasons.) It is part of the shrinking that is done to make the edges of the cap. The metal is pounded on a cylindrical metal stake and heated (annealed) between poundings to keep it from becoming brittle.

Probably ten annealing sessions to get to this point.

Probably ten annealing sessions to get to this point.

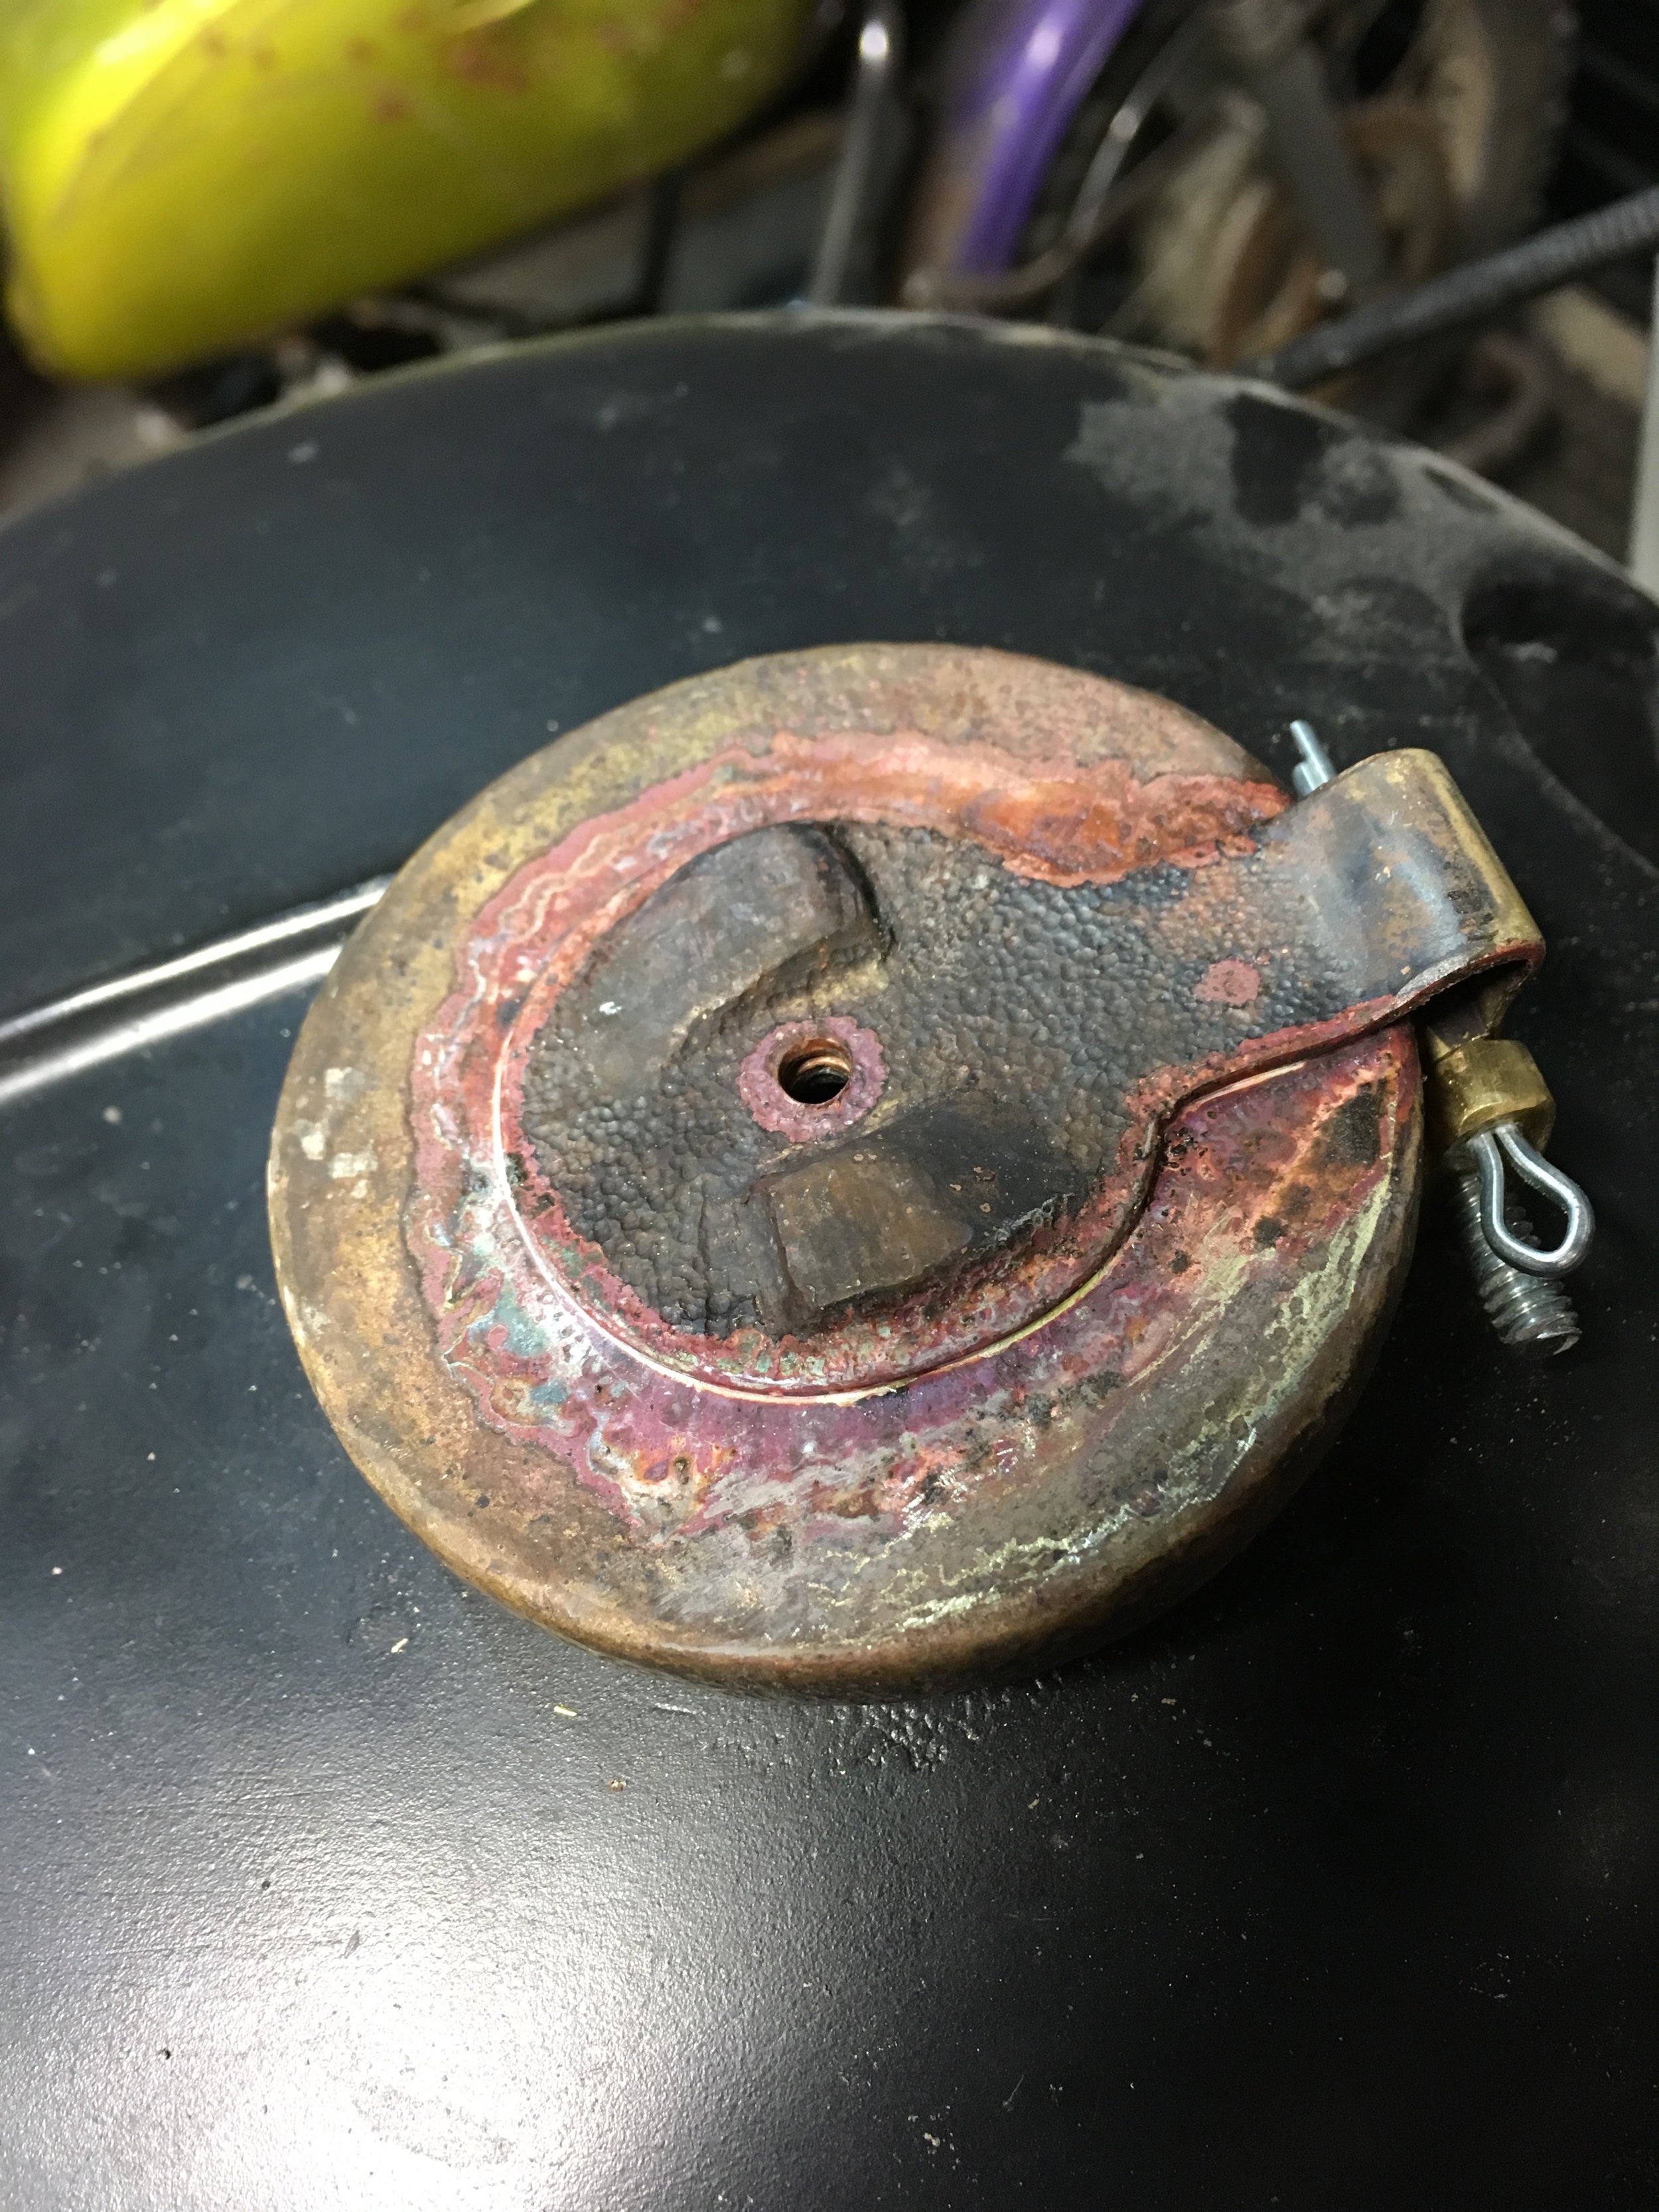
The center of the cap has a couple ramps that are used to tighten the locking lever as it is turned. In this picture, the backside of the metal has already been pounded to form the ramps, and is being chased down on the front side. You can see how t…

The center of the cap has a couple ramps that are used to tighten the locking lever as it is turned. In this picture, the backside of the metal has already been pounded to form the ramps, and is being chased down on the front side. You can see how the ramp on the right is more defined from the chasing. The long piece coming out will form part of the hinge.

The center of the cap applied by silver soldering. The pink color is pure copper brought out by the heat and flux. The bend in the rear strap going to the hinge allows the cap to stand up when open, and strengthens the hinge pivot.

The center of the cap applied by silver soldering. The pink color is pure copper brought out by the heat and flux. The bend in the rear strap going to the hinge allows the cap to stand up when open, and strengthens the hinge pivot.

Eighth inch brass plate was used to make the locking lever.

Eighth inch brass plate was used to make the locking lever.

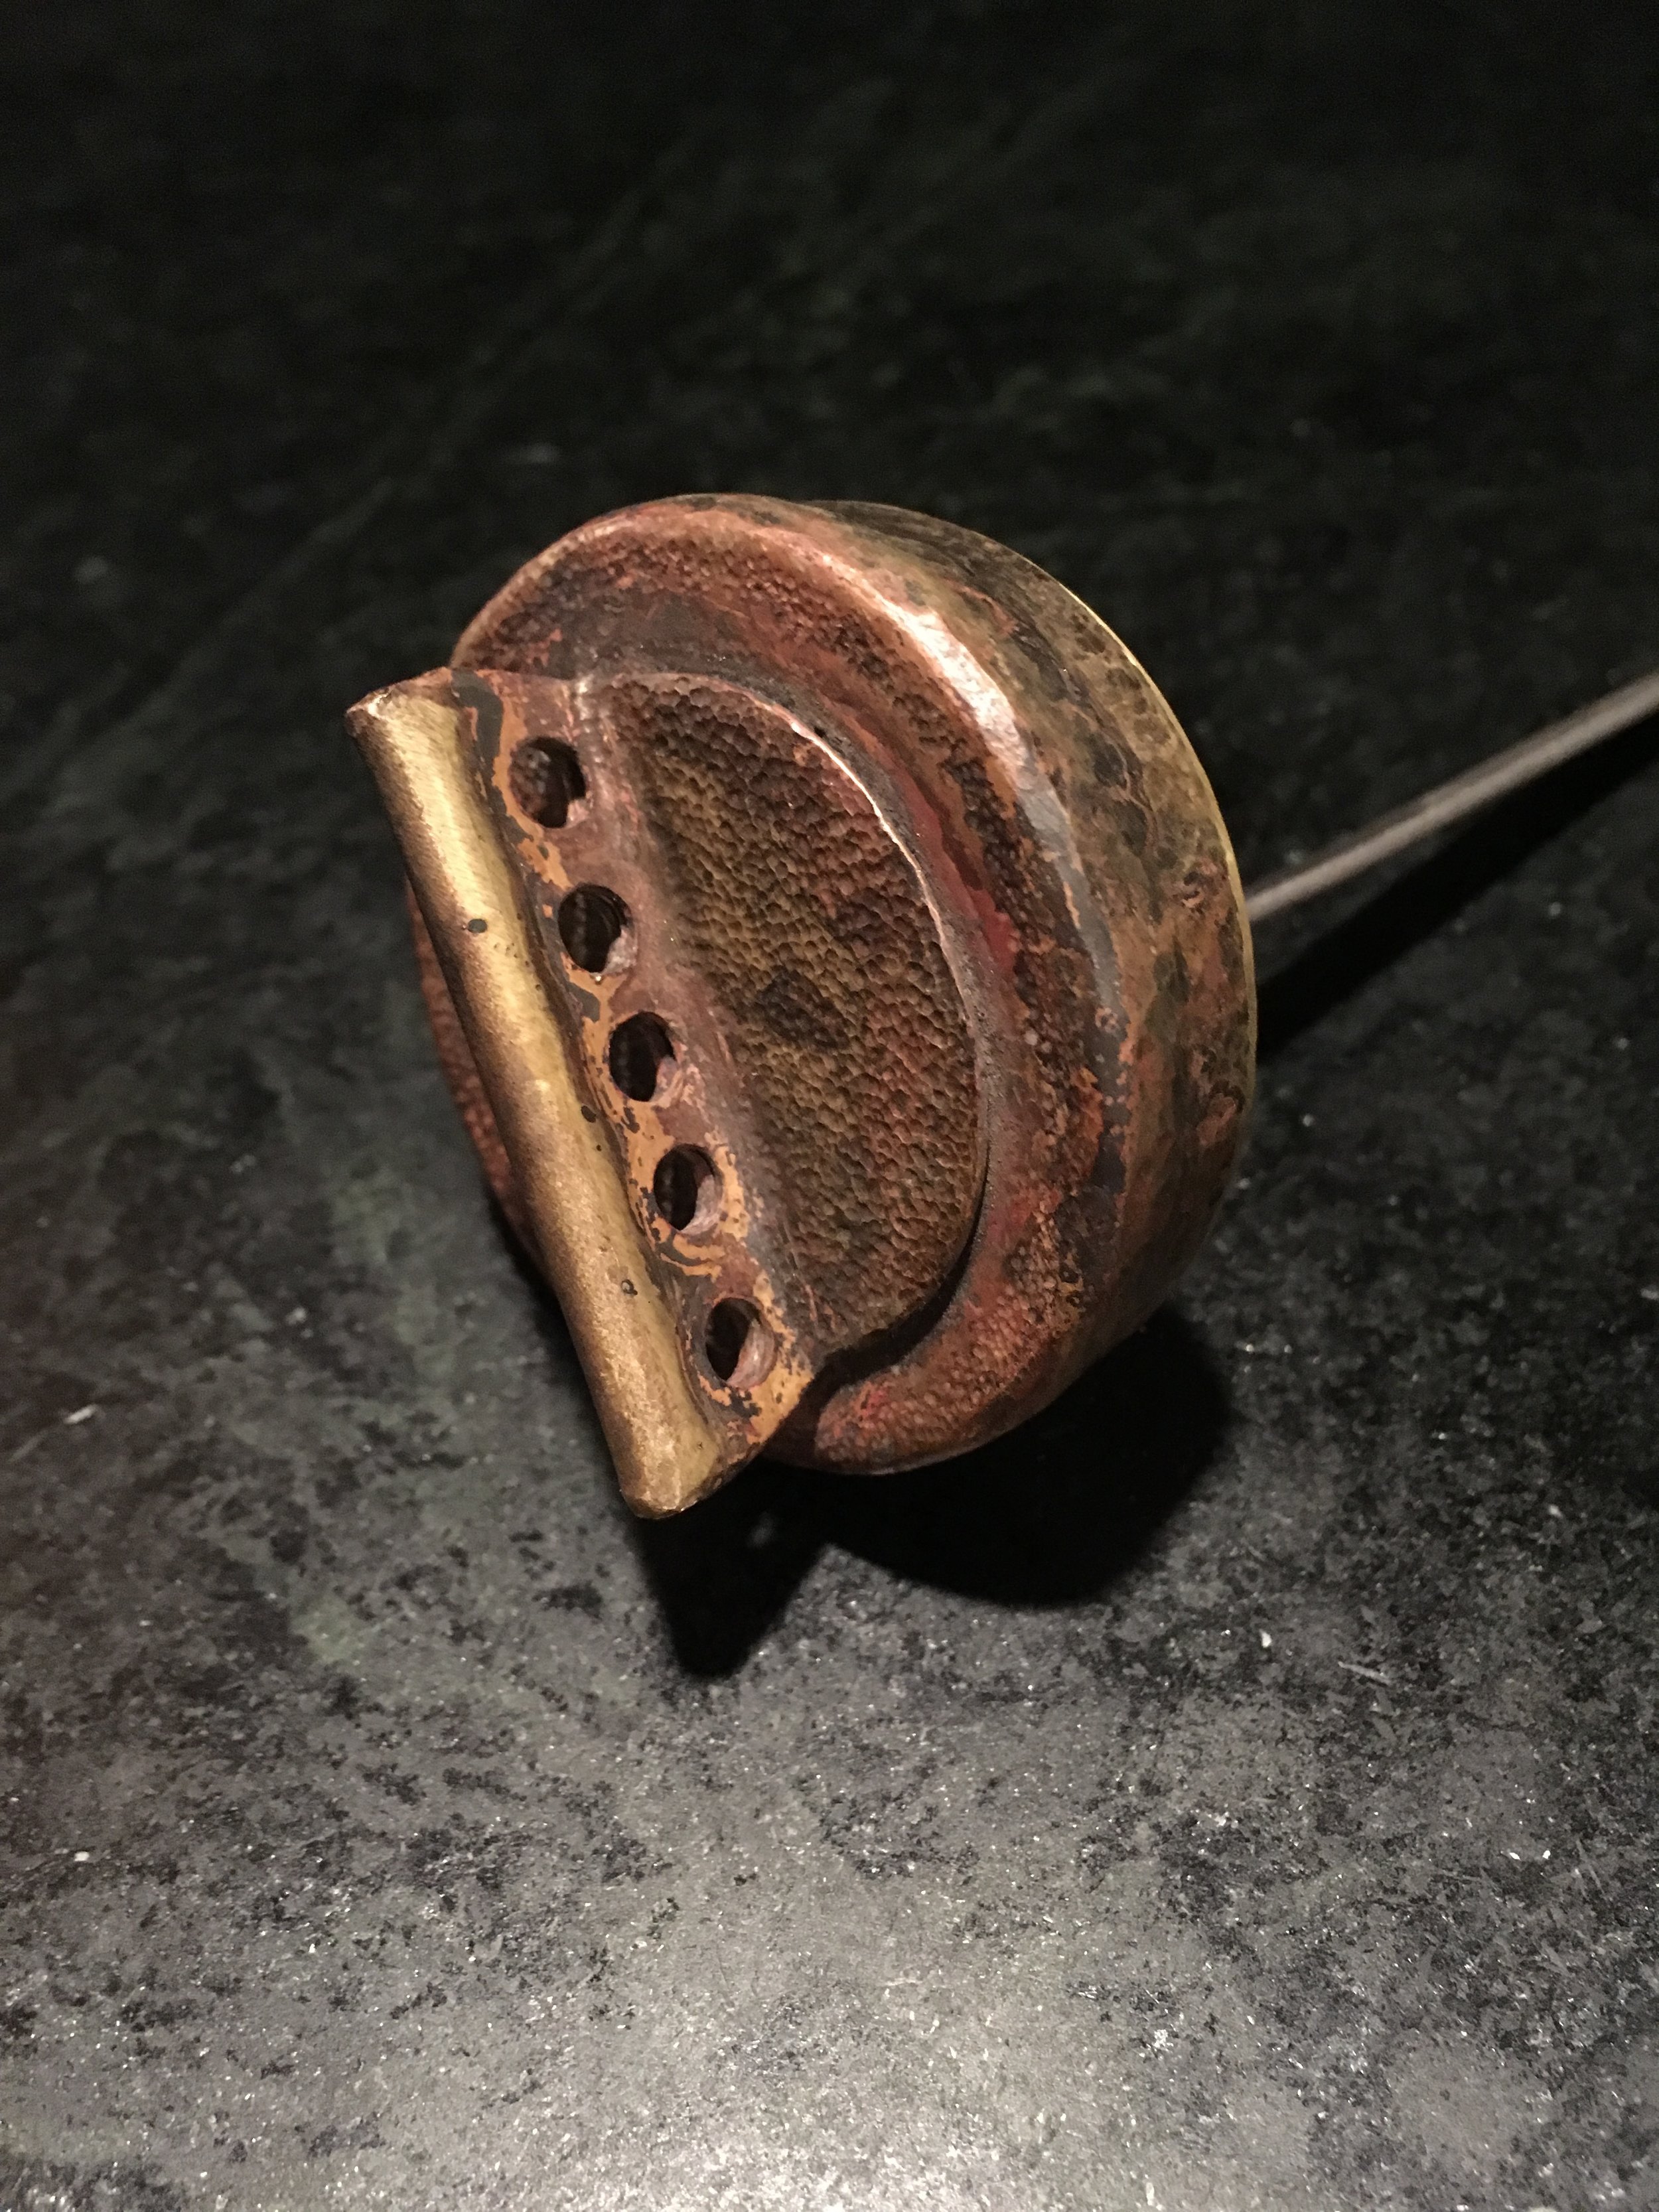
The lower half of the hinge was made from brass billet and soldered to a ring that clamps tightly to the filler neck. There are blocks of brass soldered inside the ring to rest on the edges of the tank neck where the regular cap grips it. There will…

The lower half of the hinge was made from brass billet and soldered to a ring that clamps tightly to the filler neck. There are blocks of brass soldered inside the ring to rest on the edges of the tank neck where the regular cap grips it. There will be a little more shaping of the locking lever, and the patina of the cap will be made a little more uniform.

Spring action on the locking lever pivot. Another part is to be made to attach to the underside of the cap and hold the sealing gasket and fill the neck to reduce splashing around the cap..

Spring action on the locking lever pivot. Another part is to be made to attach to the underside of the cap and hold the sealing gasket and fill the neck to reduce splashing around the cap..

One more part amlost ready to be checked off the list. It also occurs to me that a cap for the oil tank is going to be necessary now.

One more part amlost ready to be checked off the list. It also occurs to me that a cap for the oil tank is going to be necessary now.

Decided to go ahead and add the oil cap to this post. This one uses the original cap under the brass one, opposed to making a locking mechanism like on the gas cap.

Decided to go ahead and add the oil cap to this post. This one uses the original cap under the brass one, opposed to making a locking mechanism like on the gas cap.

Probably going to figure out something else small that needs to be made of brass, but this may be the last big piece.

Probably going to figure out something else small that needs to be made of brass, but this may be the last big piece.

Tags #bf11invitedbuilder, #bf11, #bornfree11, #freebirdbike
← Newer Posts Older Posts →

WTF is going on here?

Featured
tempImageltM4OQ.jpg
September 21, 2026
1982 Honda MB-5 Revival. Discovering how bad a bike can be made to run.
September 21, 2026
Read more →
September 21, 2026
tempImageZBqT4n.jpg
June 1, 2026
Final touches on the 1980 Chrome custom Z50R
June 1, 2026
Read more →
June 1, 2026
F154B95C-E47C-46F9-B9C1-E3BFCF373BB3.jpeg
July 21, 2025
1980 Honda Z50R Chrome Custom Electrical Upgrade.
July 21, 2025
Read more →
July 21, 2025
C83773A2-5E9B-4CF8-B87C-B3D452744B13.jpeg
July 9, 2025
1962 Honda CB77/CL72 Race Bike Completion.
July 9, 2025
Read more →
July 9, 2025
F18BB718-06B6-477B-9087-FC498F2DD7C8.jpeg
July 1, 2025
The 1980 Honda Z50R Chrome Custom completion.
July 1, 2025
Read more →
July 1, 2025
36644661-5DDF-4180-9EE6-90C6E8048FE1.jpeg
June 23, 2025
The 1980 Honda Z50R Chrome custom build update.
June 23, 2025
Read more →
June 23, 2025
E385E757-7291-4B97-87CA-B56936DEFB91.jpeg
June 21, 2025
A Tribute to the Z50RD. 1980 Honda Z50R Chrome Custom.
June 21, 2025
Read more →
June 21, 2025
B2C64FE9-ECEF-4B9D-91CC-3F4FE4F3A6E9.jpeg
April 13, 2025
1979 Honda Z50R Restoration.
April 13, 2025
Read more →
April 13, 2025
EB3E3EF3-D618-473C-92B6-A22B4EF424F2.jpeg
December 1, 2024
Finishing the 1967 Triumph Mountain Cub Restoration
December 1, 2024
Read more →
December 1, 2024
tempImageqULr0Y.jpg
October 10, 2024
Another 1967 Triumph Mountain Cub in the shop
October 10, 2024
Read more →
October 10, 2024


XXXXXXXXX